100 Days of Christmas Day 20: A Quick Quilted Pot Holder
You can never have too many pot holders and hot pads in a kitchen, especially if you cook and bake and preserve. This pot holder/hot pad is quick and easy to make and uses up scraps of fabric.
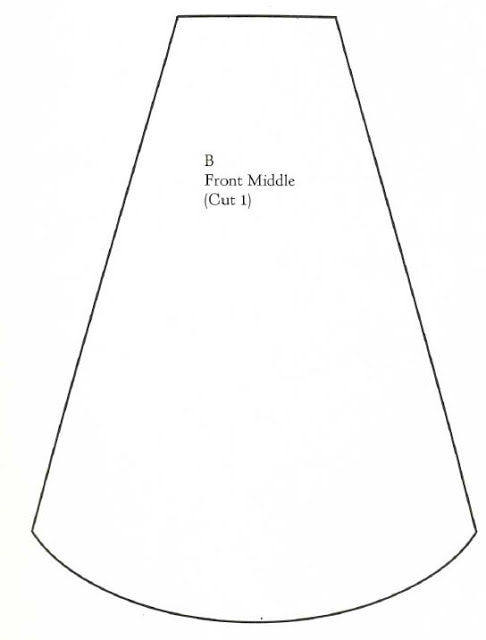
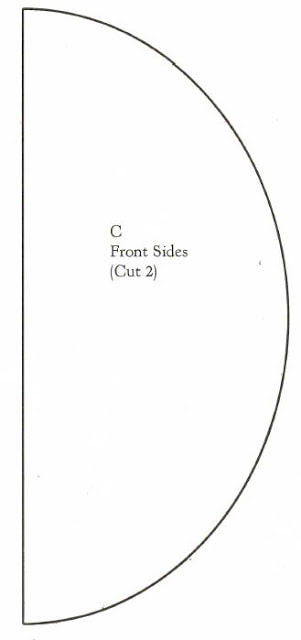
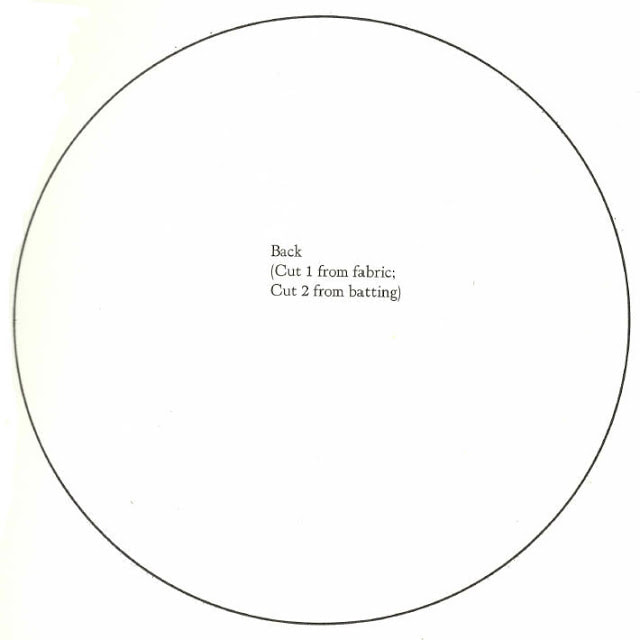
The instructions are for a 15cm round pot holder or hot pad. Simply enlarge the pattern to make bigger pot holders or hot pads.
You will need:
4 pieces of fabric 18cm x 18cm
2 pieces of batting 18cm x 18cm (I use old bath towels or woollen blankets)
Thread
Extra wide bias binding, about 50cm
The pattern pieces (enlarge them to required size)
Step 1. Copy, print and cut out your pattern pieces (enlarge them if you want a bigger pot holder, don't forget to increase your fabric accordingly).
Step 2. Cut one piece of pattern A (the centre), two of pattern B (the sides) and one of pattern c (the backing) from your fabric. Cut 2 of pattern C from your batting.
Step 3. Piece the batting and front. Lay the two layers of batting together. Place the centre (A) fabric in the centre of the batting, right side up.
Step 4. Press the straight edge of the side pieces (B) under 6mm. Place one side piece on each side of the centre piece, right sides up. Align the outer edge with the circle of batting on both sides. The straight edges of the side pieces will overlap the centre piece slightly. Pin the pieces in place. Edge stitch close to the pressed edges on the straight sides of both side pieces, through all layers. This forms the pot holder top.
Step 5. Sew pot holder. Lay the backing piece (C) on table wrong side up. On top of the place the hot pad top evenly, with the batting side down. Baste around the circle close to the edge, sewing all of the layers together. Trim the edges of the circle being careful not to get too close to your stitching.
Step 6. Attach bias binding. Lay the pot holder on the table front side up. Open the bias binding out and lay the open binding on top of the front side of the pot holder, matching the raw edge of the bias binding with the raw edge of the circle. Stitch the tape in place with a 6mm seam. Continue around the entire circle, turning the binding as needed in order to follow the cuvre of the pot holder edge. When you get to the starting point, continue to place the binding around the edge overlapping the existing binding by 12mm to complete the circle and encase the binding. Cut the remaining bias tape off.
Step 7. Finish the pot holder. Fold the bias binding and its folded edge over the edge of the pot holder to the back of the pot holder. Press if necessary to smooth out the pot holder. Pin the binding in place. Attach the binding by hand sewing it to the back layer. Stitch completely around the circle with a slip stitch.


