Sentry Page Protection
Tip Store: Crafts: Card Making & Papercraft
Sharpening Dull Trimmer Blades
Take it out of the trimmer. Very carefully, because it is still razor sharp to fingers, clean all the gunk off it. It will have lots of paper fluff on it, so use a pokey tool to clean it off the bottom and wipe it over with an alcohol wipe or baby wipe.
Then fold over a strip of foil about 6 times, put it in the trimmer and run the blade through it a few times. This will sharpen the blade so it will last a bit longer.
But when it gets dull again, don't throw it out. Mark it with a dot or something so you know it's the dull blade and use it for cutting thinner papers. Then move it to the bottom of the trimmer and put a new blade in over it for regular cutting.
Four Cards in 10 Minutes

Greeting cards - birthday, get well, sympathy, new baby, thank you and so on, are expensive. Even from the $2 shops these days they are, well $2! It used to be you could get five cards for $2, then it was four for $2, then they were $1 each, and now you pay $2 for a very simple, very boring cheap card.
You don't need a lot of special equipment to make cards, and you don't need a lot of fancy papers and stickers and other embellishments.
And best of all, you don't need a lot of time.
In just ten minutes, you can make four beautiful cards, for less than the price of one from a $2 shop. Best of all you can make them to suit the recipient by personalising the greeting, the colour, the embellishment.
To make these four gorgeous cards in under 10 minutes you will need:
4 coloured card blanks
(4) 5-1/4" x 2-1/4"" black cardstock
(4) 5-1/4" x 2" white cardstock
3/4" Circle punch
Small hole punch
Sentiment stamp
Ink pad
Adhesive
Step 1. Take the black cardstock and using the 3/4" circle punch, punch out 7 circles, leaving a narrow border. Punch 5 small dots from the remaining black cardstock.
Step 2. Stick the white cardstock to the black cardstock, being sure to hide the holes.
Step 3. Stick the black and white cardstock to the card base, leaving a narrow border at the top and sides.
Step 4. Lay out the black dots. When you are happy with the pattern, stick them down using tape runner or liquid glue.
Step 5. Stamp your sentiment to the bottom left corner of the card.
Step 6. Stick the small dots to the bottom right of the sentiment.
Repeat for the remaining three cards.
Contributed by Cath Armstrong, 15th July 2019
How to Clean Cloudy and Crazed Acrylic Stamping Blocks
Acrylic stamp block aren't expensive, but you shouldn't have to replace them when they get cloudy and look dirty. That cloudy look comes from the ingredients in the different inks, and there's not much you can do to prevent it from happening.
But there is a simple way to clean them, and using a tool just about every bathroom has - the simple hairdryer!
Turn your hairdryer to the hottest setting, turn it on and then very slowly work over the stamp block, about 5cm above the block, in slow cirlces. The heat will fix the cloudiness and most minor scratches. When the top is clear, flip the block and repeat on the back.
For any stubborn ink smudges, use a stamp cleaner (Staz-on Cleaner or the Stampin' Up stamp cleaner. I've used both, and they are brilliant - expensive, but worth it to keep those special stamps spotless). For general everyday cleaning, use non-scented baby wipes to clean stamps and stamp blocks.
How to Make a Paper Tole Card
I used to do a lot of paper tole when the children were smaller, usually at night when they were in bed. It was a way for me to unwind from a frantic day before I went to bed.
I love the detail in these 3D cards and they are so easy to do.
You can buy kits from craft shops, or you can be a true Cheapskate and make your own or, as I have for this card, download a free design. I've downloaded and used so many designs from The Paper Craft Tutor, all free. http://www.the-paper-craft-tutor.com/decoupage-etc/
You will need:
1 sheet of good quality wrapping paper with a suitable design or download a design onto good paper - I use lightweight photo paper from the $2 shop; don't skimp, the paper needs to be a good quality to withstand the layering and glue
PVA glue or glue stick
Curved nail scissors
A blank card - size is up to you and will depend on the size of your image.
Foam sticky dots or matchsticks cut into 10mm lengths (I prefer to use sticky dots, you can get them at any $2 or craft shop)
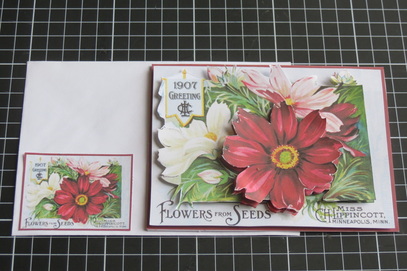
Step 1. Decide how many layers you want on your card. Traditionally paper tole is between 5 - 7 layers. For a card up to 4 layers is enough - you don't want the card design too deep to be able to fit an envelope or post. The design on this card used four layers.
Step 2. Choose your image. Using your nail scissors cut out the number of images you need - in my example I've cut out four.
Step 3. Taking one complete image, carefully cut around the edge using the curved nail scissors. Curved nail scissors make cutting the fine detail so much easier than regular craft scissors and give the edges of the image a nice finish. Glue this image to the card. This is your base.
Step 4. Taking the next image, choose which parts you are going to layer onto the base. At this stage it is usually trimmed down version of the complete image. Use the nail scissors to cut them out. Using the sticky dots, stick them in place over the corresponding part of the base image.
Step 5. Continue as above with the third image, cutting out and layering with the sticky dots the main features of the design to give finer detail.
Step 6. The fourth and last layer is the layer with the finest detail - the details of the last layer. You may need to cut the sticky dots in half as the layers are small for this step.
Step 7. Add a sentiment if desired - handwritten, stamped or pre-made and glued in place.
And there you have it - a gorgeous paper tole card for the price of a sheet of wrapping paper and a blank card - under $2.50 if you buy wrapping paper, around 50 cents if you use a free download. And depending on the size of the design you choose you will get at least four cards from one sheet of wrapping paper, bring the cost down even more.
Contributed by Cath Armstrong
I used to do a lot of paper tole when the children were smaller, usually at night when they were in bed. It was a way for me to unwind from a frantic day before I went to bed.
I love the detail in these 3D cards and they are so easy to do.
You can buy kits from craft shops, or you can be a true Cheapskate and make your own or, as I have for this card, download a free design. I've downloaded and used so many designs from The Paper Craft Tutor, all free. http://www.the-paper-craft-tutor.com/decoupage-etc/
You will need:
1 sheet of good quality wrapping paper with a suitable design or download a design onto good paper - I use lightweight photo paper from the $2 shop; don't skimp, the paper needs to be a good quality to withstand the layering and glue
PVA glue or glue stick
Curved nail scissors
A blank card - size is up to you and will depend on the size of your image.
Foam sticky dots or matchsticks cut into 10mm lengths (I prefer to use sticky dots, you can get them at any $2 or craft shop)
Step 1. Decide how many layers you want on your card. Traditionally paper tole is between 5 - 7 layers. For a card up to 4 layers is enough - you don't want the card design too deep to be able to fit an envelope or post. The design on this card used four layers.
Step 2. Choose your image. Using your nail scissors cut out the number of images you need - in my example I've cut out four.
Step 3. Taking one complete image, carefully cut around the edge using the curved nail scissors. Curved nail scissors make cutting the fine detail so much easier than regular craft scissors and give the edges of the image a nice finish. Glue this image to the card. This is your base.
Step 4. Taking the next image, choose which parts you are going to layer onto the base. At this stage it is usually trimmed down version of the complete image. Use the nail scissors to cut them out. Using the sticky dots, stick them in place over the corresponding part of the base image.
Step 5. Continue as above with the third image, cutting out and layering with the sticky dots the main features of the design to give finer detail.
Step 6. The fourth and last layer is the layer with the finest detail - the details of the last layer. You may need to cut the sticky dots in half as the layers are small for this step.
Step 7. Add a sentiment if desired - handwritten, stamped or pre-made and glued in place.
And there you have it - a gorgeous paper tole card for the price of a sheet of wrapping paper and a blank card - under $2.50 if you buy wrapping paper, around 50 cents if you use a free download. And depending on the size of the design you choose you will get at least four cards from one sheet of wrapping paper, bring the cost down even more.
Contributed by Cath Armstrong