Sentry Page Protection
Quick & EAsy Moo dusters
Monday 10 August 2020, by Cath
When I became a Cheapskate, it changed my life in so many ways. I learned to save money, really live on a budget, cook from scratch (properly and really), sew, knit, crochet and a whole lot of other things.
And I learned the usefulness of something isn't over when it is no longer suitable for it's designed purpose.
For instance, the humble flannelette pajamas. Their useful life keeps you warm at night (and on pajama days at home). They're comfortable and cosy. But they wear thin after a few years, fade and shrink. So they've outlived their intended useful life.
But they are still useful. One way is to simply turn them into dusters.
Dusters and cleaning cloths aren't cheap. They start at around $2 each from discount department stores and $2 shops, and just go up in price, depending on the brand and where you buy them.
It makes sense to MOO them when you can, and below are five different ways you can MOO dusters, so even if you are an absolute novice, you'll still be able to manage this project and make something pretty and useful for your home (or office or car or caravan).
For this lot of dusters I've used old flannelette pajamas that were too worn to use as pjs, but with plenty of life left in the fabric. You could use old t-shirts, or track suiting, or even toweling. Anything that is well worn so it's soft, and that can be laundered is suitable.
Choose the size of your dusters. I like a larger duster, around 25cm (10 inches) square, so that's the size I cut. If you prefer larger dusters or smaller cleaning cloths, cut the fabric to suit.
Now you have to make a choice (I know, we shouldn't be given choices, sometimes it's just too hard to decide, but really these are easy choices).
Choice 1. You can cut the squares, fold them and put them away. This is, obviously, the easiest way to make nice, soft, MOO dusters.
Choice 2. Using your sewing machine, zig zag around the edges. This will help to stop them fraying as you use and wash them.
Choice 3. Fold each edge over 6mm to the back, then over again 6mm. Press to hold in place. Using your sewing machine, stitch around the edge to hold in place. They'll last a long time like this and stand up to many, many washings.
Choice 4. Take two squares and place them right sides together. Stitch around the edge, using a 6mm seam. Leave a small opening for turning. Turn right sides out. Press the opening closed. Top stitch around the edges. This style is extra thick and soft, perfect for dusting on one side, and polishing on the other.
Choice 5. This is my favourite, a little more complicated, but if I'm going to make dusters and cleaning cloths, I want them to be pretty.
Place two squares together, right sides out.
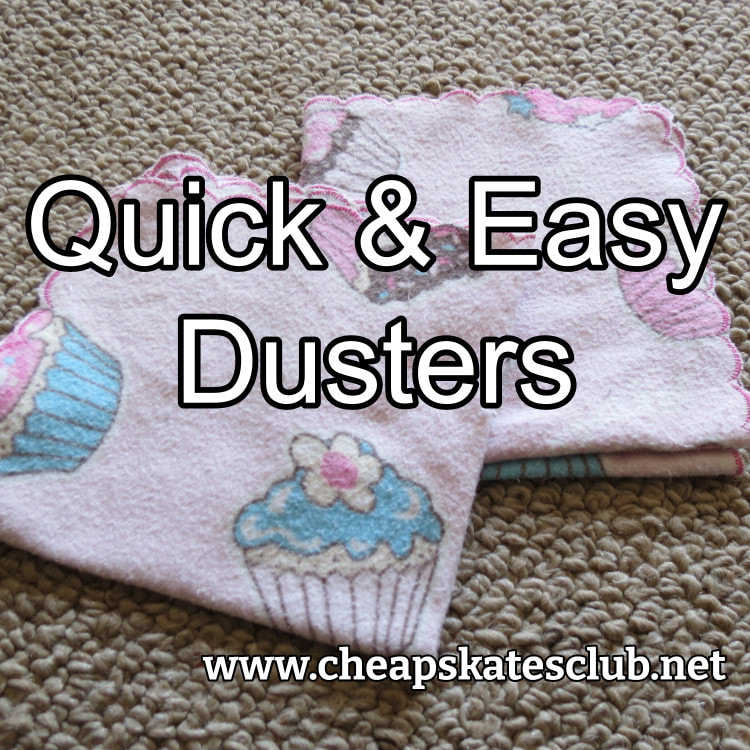
Choose an embroidery stitch on your sewing machine and stitch around the edges, being sure to keep the raw edges together. I round the corners to keep the pattern going. Use embroidery scissors to trim the loose threads.
This style just makes me smile. The edges are so pretty, they are quick to make, taking about 5 minutes each, and really, if you're going to dust and polish, why not have pretty cloths!
However you choose to make your dusters, you're saving money and stopping something going to landfill before it has truly finished it's life.
Now what do you have lurking in the wardrobe that can find another useful life as a duster?
And I learned the usefulness of something isn't over when it is no longer suitable for it's designed purpose.
For instance, the humble flannelette pajamas. Their useful life keeps you warm at night (and on pajama days at home). They're comfortable and cosy. But they wear thin after a few years, fade and shrink. So they've outlived their intended useful life.
But they are still useful. One way is to simply turn them into dusters.
Dusters and cleaning cloths aren't cheap. They start at around $2 each from discount department stores and $2 shops, and just go up in price, depending on the brand and where you buy them.
It makes sense to MOO them when you can, and below are five different ways you can MOO dusters, so even if you are an absolute novice, you'll still be able to manage this project and make something pretty and useful for your home (or office or car or caravan).
For this lot of dusters I've used old flannelette pajamas that were too worn to use as pjs, but with plenty of life left in the fabric. You could use old t-shirts, or track suiting, or even toweling. Anything that is well worn so it's soft, and that can be laundered is suitable.
Choose the size of your dusters. I like a larger duster, around 25cm (10 inches) square, so that's the size I cut. If you prefer larger dusters or smaller cleaning cloths, cut the fabric to suit.
Now you have to make a choice (I know, we shouldn't be given choices, sometimes it's just too hard to decide, but really these are easy choices).
Choice 1. You can cut the squares, fold them and put them away. This is, obviously, the easiest way to make nice, soft, MOO dusters.
Choice 2. Using your sewing machine, zig zag around the edges. This will help to stop them fraying as you use and wash them.
Choice 3. Fold each edge over 6mm to the back, then over again 6mm. Press to hold in place. Using your sewing machine, stitch around the edge to hold in place. They'll last a long time like this and stand up to many, many washings.
Choice 4. Take two squares and place them right sides together. Stitch around the edge, using a 6mm seam. Leave a small opening for turning. Turn right sides out. Press the opening closed. Top stitch around the edges. This style is extra thick and soft, perfect for dusting on one side, and polishing on the other.
Choice 5. This is my favourite, a little more complicated, but if I'm going to make dusters and cleaning cloths, I want them to be pretty.
Place two squares together, right sides out.
Choose an embroidery stitch on your sewing machine and stitch around the edges, being sure to keep the raw edges together. I round the corners to keep the pattern going. Use embroidery scissors to trim the loose threads.
This style just makes me smile. The edges are so pretty, they are quick to make, taking about 5 minutes each, and really, if you're going to dust and polish, why not have pretty cloths!
However you choose to make your dusters, you're saving money and stopping something going to landfill before it has truly finished it's life.
Now what do you have lurking in the wardrobe that can find another useful life as a duster?