Three Simple Christmas Cards
Long gone are the days when you could zip into a $2 shop and pick up all the cards you need for the year at rock-bottom prices. I remember going through the racks to make sure I chose the prettiest pictures with the nicest sentiments as I stocked up on my 5 for $2 cards - yes, they were 40 cents each (and in those days I had to budget for that $2!).
Of course you could go into one of the dedicated card shops and pick up a truly beautiful card, and pay $7+ per card. These days, if you can find a card for $7 it would be a bargain in one of these tempting shops.
When we were first married, I chose to make our Christmas cards each year, and that started me on my card making journey. And it has been a journey; over the years my skills have improved, I've collected a nice range of stamps and ink pads and embellishments. My paper stash is still huge, even though I use it all for card making (and scrapbooking).
Making that decision 32 years ago has saved us, well I have no idea how much truly, over the years. But it's a lot. In a normal year I send 42 birthday cards, as well as Christmas cards, get well cards, baby/engagement/wedding cards, Mother's Day and Father's Day and quite a few "just thinking of you" cards. Even if I only paid $2 per card, it could easily save us around $200.
So, now it's winter, and the Cheapskates Christmas in July Challenge is under way, if you send a lot of cards, or would like to send a lot of cards but don't because of the cost, here are some ways you can, without any special tools or materials, and minimal expense.
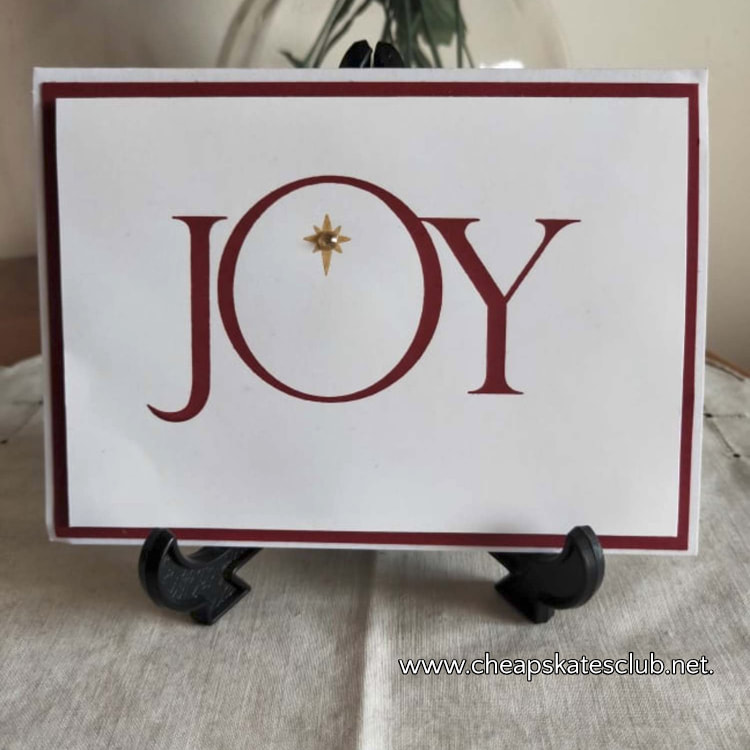
The Joy Card
You will need:
1 card base 14.5cm x 10.5cm
I piece dark red cardstock 14cm x 10cm
1 piece white cardstock 13.5cm x 9.5 cm
Joy Stamp
Dark red ink pad
Gold star sticker
Gold gem
Glue
Pop-dots
Step 1. Adhere the dark red cardstock to the front of the card base. Make sure to centre it
Step 2. Ink up the stamp with dark red ink. Stamp in centre of white cardstock (13.5cm x 9.5cm).
Step 3. Centre the gold star in the inside top of the 'O'. Add the gold gem to the centre of the star.
Step 4. Place pop-dots on the back of the white cardstock. Remove backings and carefully centre over the dark red cardstock.
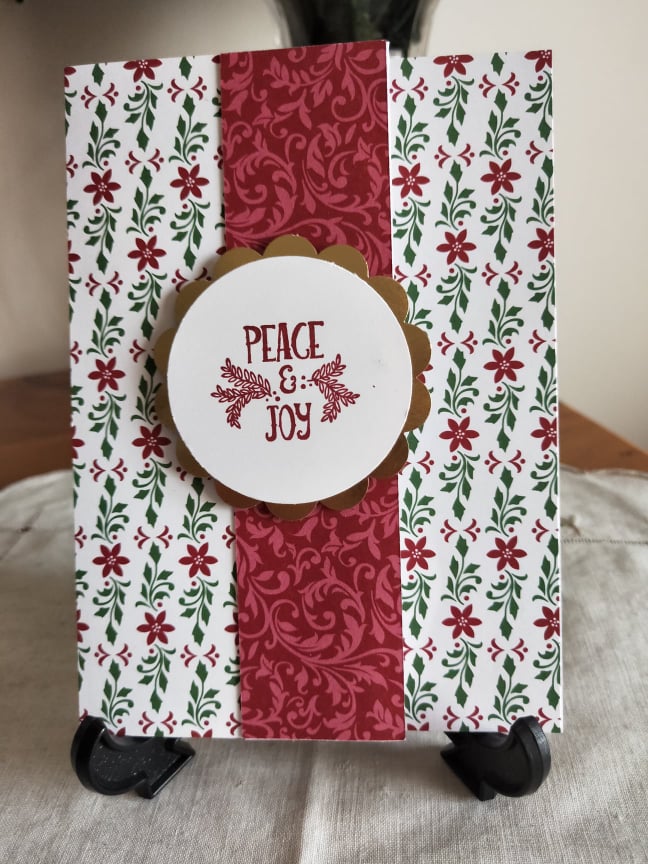
Peace and Joy Card
You will need:
1 card base 14.5cm x 10.5cm
1 piece patterned paper 14.5cm x 7cm
1 piece patterned paper (same pattern as above) 14.5cm x 4cm
1 piece patterned paper (contrast) 14.5cm x 3.5cm
1 6cm circle gold cardstock
1 5cm circle white cardstock
Stamp
Co-ordinating or matching ink pad
Glue
Pop dots
Step 1. Score front of card base at 7cm on the short side. Fold outwards and burnish fold.
Step 2. Stick the 14.5cm x 7cm piece of patterned paper to the front of the card. Stick the 14.5cm x 4cm strip of patterned paper to the inside edge of the card.
Step 3. Fold the flap to the outside and glue down. Stick the 14.5cm x 3.5cm strip of patterned paper to the flap.
Step 4: Stamp the sentiment to the centre of the white circle. Add pop-dots to the back and centre it over the gold circle.
Step 5. Centre the gold circle on the card; it will hang over the flap, that's OK. Add pop-dots to the back of the gold circle, but only on the side that covers the front of the card - don't go over the flap, or your card won't open. Remove backing and stick in place.
Merry Christmas Strip Card
You will need:
1 card base 14.5cm x 10.5cm
1 strip patterned paper 14.5cm x 2cm
2 strips co-ordinating patterned paper 14.5cm x 1 cm
Glue
Merry Christmas sticker or stamp and matching ink
Step 1. Centre the 2cm strip of patterned paper on the front of the card (working in landscape mode) and stick down.
Step 2. Glue one of the 14.5cm x 1cm strips at the top of the larger strip, lining it up so there are no gaps. Glue the other one underneath.
Step 3. Centre Merry Christmas stick on the wider strip.
Platinum members can login for full access to the Member's Centre
Not a Platinum Cheapskates Club Member?
Please upgrade to a Platinum Cheapskates Club membership to be able to access our Member's Centre.
Click here to upgrade your Cheapskates Club membership today
Not a Platinum Cheapskates Club Member?
Please upgrade to a Platinum Cheapskates Club membership to be able to access our Member's Centre.
Click here to upgrade your Cheapskates Club membership today