THE CHEAPSKATES CLUB
  • Home
  • Join
  • About Us
    • Cath's Story
    • Ask Cath
    • Glossary of Cheapskating Terms
  • Forum
    • Current Forum Discussions
  • Inspiration
    • Getting Started
    • Articles
    • Budget Renovations
    • Saving Stories
    • Learning Centre
  • Recipes
    • Recipe File Index
    • Meal Plans
    • Add a Recipe
    • $300 a Month Food Challenge >
      • $300 a Month Food Challenge
      • The $300 a Month Food Challenge Forum
  • Newsletters
    • Newsletters 2021
    • Newsletters 2020
    • Newsletters 2019
    • Newsletters 2018
    • Newsletters 2017
  • Saving Money
    • Latest Tips January 2021
    • Cheapskates Tip Store
    • Tip Sheets
    • Top Tip Competition
  • Contact
    • Changing Details

Scosies

26/6/2017

0 Comments

 
Picture
One of the things I love about living the Cheapskates way is the challenge to re-purpose things. Sometimes it's things we no longer use, often it's things we have never used but have in the house, just waiting for a purpose. 

Over the years I have collected a lot of vintage linens and I love to turn them into things I can use, things that make me smile and make our lives as a family just that little bit more comfortable. 

Today I made a scosie from a lovely old tea towel. I have been waiting for the perfect project for this tea towel and the scosie was it. 

A scosie is a scone cosy, a simple way to keep fresh scones warm while on the table. After all scones with jam and cream go much better when the scones are warm.  You can use new tea towels, but vintage tea towels add a charm that new fabric just doesn't have. Waffle weave or toweling tea towels will keep the scones warm until the last bite. For a prettier scosie use printed cotton or even tulle and lace. 

To make a scosie:

Step 1. Use a dinnerplate to trace 2 circles onto your fabric. Cut around the edge of each circle.

Step 2. Finish the raw edge of each circle with bias binding. Add any lace or ric rac embellishments. 

Step 3. Use tailors chalk (or a very light pencil) to divide one circle into six wedges.  Place the marked circle on top of the second circle. Sew along the lines. 

Scosies make a lovely gift, especially if you fill them with scones and present them on a vintage plate.

Shared from Debt Free, Cashed Up and Laughing
0 Comments

What to do with 20 Kilos of Brown Onions?

16/6/2017

7 Comments

 
Picture
My local greengrocer had a fantastic special on onions this week - 10 kilo bags for $3!  That's just 30c a kilo - about an 80 per cent saving on supermarket prices.

I couldn't resist and before I knew it two bags had mysteriously made their way into my kitchen.

So faced with 20 kilos of brown onions what was I to do?

Well first off I roped in all the family and had them take turns at peeling - a half a bag each.  That was the worst chore over and done with.

Then I took out the food processor and, using the chopping blade, I processed half of them. Now that's a lot of chopped onion, and I did it in batches. With my trusty 1/2 cup measure I portioned those chopped onions into ziplock bags ready to go into the freezer.

Those bags of frozen onion will be used to prepare rissoles and burgers, meatloaf, pies, soups and stews, casseroles, pies and quiche and anything else that needs diced or chopped onion this winter.

The remaining onions were sorted and any small enough to roast were blanched, drained and put onto a baking paper lined baking sheet and then flash frozen. I'll use these for our Sunday roasts. When they are completely frozen they'll be bagged up too.

That left about 7 kilos of rather largish onions. Those were sliced on the mandolin. They will be great for hamburgers and steak sandwiches and crumbed they'll make lovely onion rings. The mandolin had them sliced up, into lovely even slices, in no time. And again they went into ziplock bags, this time in 1 cup portions.

Now there is a green bag in the freezer, full of packets of diced, sliced or whole onions.

It did take a couple of hours to process that 20 kilos, but it will save me a lot of time over winter. When a recipe calls for onion I will be able to just pull a packet out of the freezer. 

And know that I've saved around $24 too.

What do you buy in bulk to prepare ahead and freeze? Leave a comment and inspire us!

This post was shared from Debt Free, Cashed Up and Laughing
7 Comments

MOO Condensed Milk

11/6/2017

2 Comments

 
Picture
I've just been browsing the Coles catalogue for this week and notice that condensed milk is on sale for $2.50, save 70 cents. I was gobsmacked! It's obviously been a while since I bought condensed milk because the last time (I just checked my notes) it was $1.69!

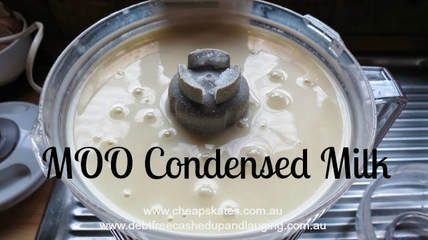
I do use condensed milk quite often, in baking and to make Russian caramels, but I can assure you I wouldn't be if I had to pay $2.50, let alone $3.20, a can (and those cans are about 30g smaller than they were when they were $1.69!).

MOO condensed milk has been a staple in my pantry for years. It's easy to make, tastes and works exactly like the tinned version and costs less than $2 to make more than double the quantity you'd be paing $3.20 for.

Here's my go to condensed milk recipe - and don't worry about being able to store it before it goes yellow. It will keep in the fridge for at least a week, longer if you turn the container upside down. But it freezes! Yes, put any extra in the freezer until you're ready to use it in another recipe.

MOO Condensed Milk
​Ingredients:
1 cup hot water
2 cups skim milk powder
2 cups white sugar
6 tbsp butter or margarine

Method:
Place all ingredients in a food processor and mix for about 3 minutes. The mixture will be quite thin, but thickens on standing for about an hour. Use immediately or refrigerate for up to one week. Can be frozen, thaw before use.

Makes 3 cups.

Seriously, it is so quick and easy to make and so cheap - why would you ever spend your hard earned dollars on tinned condensed milk?

Shared from Debt Free, Cashed Up and Laughing
2 Comments

How to Make Re-usable Veggie Bags

10/6/2017

4 Comments

 
Picture
We have become very used to using fabric grocery bags in the last few years but we are still using millions of veggie bags each year (veggie bags are the plastic bags on the roll in the fruit and veg department).

Even if we re-use them over and over they still end up in landfill and they take a very long time to breakdown. If they end up in our waterways the potential damage is even worse. A solution is to use fabric veggie bags and keep a supply on hand, just as we do with the grocery bags.

When I first started using them I'd get some odd looks at the check-out. After an explanation of how I am trying to reduce my impact on the environment and avoid using plastic bags, and that I was prepared to pay the two or three cents more to cover the weight of the bag, it was OK.  In fact these days my regular market stalls and orchards know me and don't even comment any more. Sometimes other customers do though, and I just go through the explanation again.

I’ve made mine out of tulle that I had in the cupboard, left over from our fairy party days and just waiting for another use and an old net curtain. You can use any light weight, sheer fabric. Remember, it has to be light  weight, as it will add to the cost of your produce if it is too heavy. You can use old sheer curtaining (pick up a curtain or two at the op shop, mine cost $1.50 and made dozens of bags, or a garage sale if you don’t have any) or lace if you have it.

To make a veggie bag you will need:
Sheer, light weight fabric measuring 70cm x 50cm – use light tulle, lightweight curtains, nylon etc
1.5 metres of ribbon or strong twine

1.  Cut the tulle into a rectangle measuring 70cm x 50cm

2.  Fold in half widthways – your rectangle should measure 35cm x 50cm

3.  Measure down 2.5cm from top edge on both sides and mark with a pin

4.  Stitch down first side, starting at pin, and along the bottom to the fold. Turn bag inside out.

5.  Starting at the pin, stitch around the bag again, this time along the seam. This will strengthen the seams and make the bag a little stronger.

6.  Make the casing for the ribbon by turning the top edge down 2.5cm and stitching in place.
This makes a casing on the top of the bag.

7.  Thread the ribbon through the casing, leaving a length at each end. Knot the ends together. To close the bag, pull up the ribbon and tie a slip knot.

This makes a bag a little larger than a large plastic veggie bag, perfect for family sized quantities of fruit and vegetables.

I keep my stash of veggie bags in one of the green grocery bags and they live in the boot of the car ready for shopping.  Oh, and you can wash your veggie bags too when they get a little grotty (as they will with use).  I toss them in with the towels or the sheets and line dry and they are as good as new.

It may seem silly to you to be using bags I've made myself, that will add to the final cost of the produce I buy (it's only a couple of cents, the bags are very light) when I'm trying to save money and live to our Spending Plan. I think of it as my contribution to saving the environment.

Plastic bags take a very long time to breakdown, even the ones made of organic material. And they do an almost incomprehensible amount of damage if they get into waterways. Animals get caught up in them, or eat them. If they make it to rivers, streams or the ocean then sea life suffers.

If I can not use just 5 bags a week, that's 260 less plastic bags to destroy the environment. Now imagine if every Cheapskater stopped using just 5 veggie bags a week - how many millions of bags would that keep out of landfill each year?

What an impact one simple, painless little action could have on our world!

Shared from Debt Free, Cashed Up and Laughing
4 Comments

    Archives

    May 2020
    April 2020
    March 2020
    February 2020
    January 2020
    December 2019
    November 2019
    October 2019
    September 2019
    July 2019
    May 2019
    April 2019
    March 2019
    February 2019
    January 2019
    December 2018
    October 2018
    September 2018
    August 2018
    July 2018
    June 2018
    May 2018
    April 2018
    January 2018
    November 2017
    October 2017
    September 2017
    August 2017
    July 2017
    June 2017
    May 2017
    April 2017
    March 2017
    March 2016
    November 2015
    September 2015
    August 2015
    July 2015
    June 2015
    May 2015
    March 2015
    February 2015
    January 2015
    October 2014
    September 2014
    August 2014
    July 2014
    May 2014
    April 2014
    March 2014
    February 2014
    October 2013
    August 2013
    July 2013
    May 2013
    February 2013
    December 2012
    November 2012
    October 2012
    September 2012
    August 2012
    July 2012
    June 2012
    May 2012
    March 2012
    February 2012
    December 2011
    November 2011
    October 2011
    September 2011
    July 2011
    June 2011
    April 2011
    March 2011
    February 2011
    December 2010
    September 2010
    June 2010
    May 2010
    March 2010
    February 2010
    March 2009

    Categories

    All
    $2 Dinners
    $300 A Month Food Challenge
    BBQ
    Beauty
    Bread
    Breakfast
    Budget
    Cakes
    Centrelink
    Children
    Christmas
    Cleaning
    Cooking
    Craft
    Crochet
    Debt Free Cashed Up And Laughing
    Debt Reduction
    Desserts
    Drinks
    Easter
    Electricity
    Entertainment
    Family
    Finances
    Financial Help
    Gardening
    Gift Ideas
    Gluten Free
    Groceries
    Grocery Bduget
    Grocery Shopping
    Handmade Christmas
    Health
    Holidays
    Homemaking
    Kitchen
    Laundry
    Leftovers
    Living The Cheapskates Way
    Meal Planning
    Meatless Meals
    Mixes
    MOO
    Mother's Day
    Natural Remedies
    No Bake
    Organisation
    Pancakes
    Pie Maker
    Preserves
    Preserving
    Pressure Cooker
    Price Book
    Real Estate Selling
    Recipe File
    Recycling
    Saving
    Sewing
    Shopping
    Shopping List
    Snacks
    Special Occasions
    Stockpile
    St Patricks Day
    Tip Store
    Valentine's Day
    Vegetables
    Want Not
    Waste Not

    RSS Feed


About

Getting Started

Tools & Guides

Follow Us

Cath's Story
You Really Can Live on One Income
Join the Cheapskates Club
Site Information
Contact
Begin here
Newsletter Archive
Journal Archive
$300 a Month Food Challenge
Forum
Cheapskates Tip Store
Cheapskates Recipe File
Tip Sheets
Facebook
YouTube

Copyright ©2001 - 2020 THE CHEAPSKATES CLUB, All Rights Reserved
  • Home
  • Join
  • About Us
    • Cath's Story
    • Ask Cath
    • Glossary of Cheapskating Terms
  • Forum
    • Current Forum Discussions
  • Inspiration
    • Getting Started
    • Articles
    • Budget Renovations
    • Saving Stories
    • Learning Centre
  • Recipes
    • Recipe File Index
    • Meal Plans
    • Add a Recipe
    • $300 a Month Food Challenge >
      • $300 a Month Food Challenge
      • The $300 a Month Food Challenge Forum
  • Newsletters
    • Newsletters 2021
    • Newsletters 2020
    • Newsletters 2019
    • Newsletters 2018
    • Newsletters 2017
  • Saving Money
    • Latest Tips January 2021
    • Cheapskates Tip Store
    • Tip Sheets
    • Top Tip Competition
  • Contact
    • Changing Details