 Winter mornings mean hot breakfasts in our house. The most popular hot breakfast is porridge. It's not the porridge of years go however. It's warm and creamy and ready to eat as soon as we get up. It's slowcooker porridge and I just love it.
The secret to slowcooker porridge is to always use rolled oats, not instant rolled oats, and to use a suitable sized crock. If you are making porridge for four and only have a 6 litre slowcooker you'll end up with dried, disgusting rubber unless you cook your porridge in a smaller dish. Follow the instructions and you'll end up with the creamiest porridge you've ever enjoyed - don't be tempted to skimp on the water, you need it all. Slowcooker Porridge Ingredients: 1 cup rolled oats 1.25 litres (5 cups) cold water Pinch salt. Method: Put the oats, water and salt into a heatproof bowl with a lid that fits inside your slowcooker. Put the bowl into the slowcooker and add water to the crock until it comes about halfway up the side of your heatproof bowl of ingredients. Turn the slowcooker to low. Put the lid on. Cook for 8 hours. Now if you have a smaller slowcooker you can add the ingredients to the crock and cook them. Also, newer slowcookers tend to cook faster and hotter than the older style. I set the timer to start cooking at 11pm and breakfast is ready when we get up at 7am. You can add dried fruit and cinnamon to your porridge while it's cooking. Some recipes call for using half milk and half water. Don't. The milk will cause the porridge to stick and it may even burn, ruining your porridge. Leave adding the milk until you are ready to serve.
0 Comments
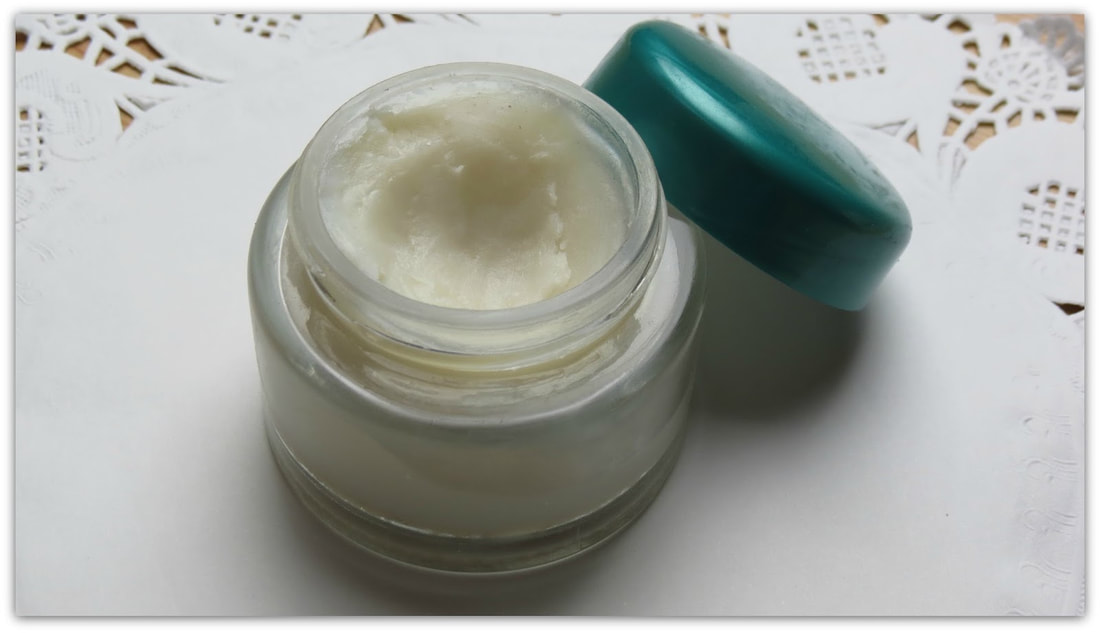 Eczema is horrible. It's red, itchy, scaly, painful and ugly. If left untreated it can leave horrible scars. And it is almost as common as the common cold. And like the cold, there really isn't any one successful treatment for this painful skin complaint. Hannah and AJ both suffer from eczema and have done since they were babies (another reason I MOO washing powder and soap). Over the years we've spent a fortune on creams and lotions, doctors and specialists, natural remedies and some not so natural. And while some of them worked for a short while the eczema always came back and the painful cycle would begin all over again. Until Hannah found a recipe for a homemade cream and gave it a try. And it worked! Oh joy, oh happy relief! It soothes and stops the itching, cools the skin quickly and moisturises and softens dry scaly patches. Best of all we had all the ingredients in the kitchen. Over the years we've tweaked it to the recipe below. It is far and away the best eczema cream we have used and its all natural - not a steroid in sight, no need for a prescription and it costs under $1 a jar. *This price was current at the time of publishing. As of 30th September 2023, the cost of a jar of MOO Soothing Eczema Cream is $1.57 - the greatest increase was the cost of the coconut oil. It only has four ingredients: rolled oats, coconut oil, rosemary oil* and olive oil. 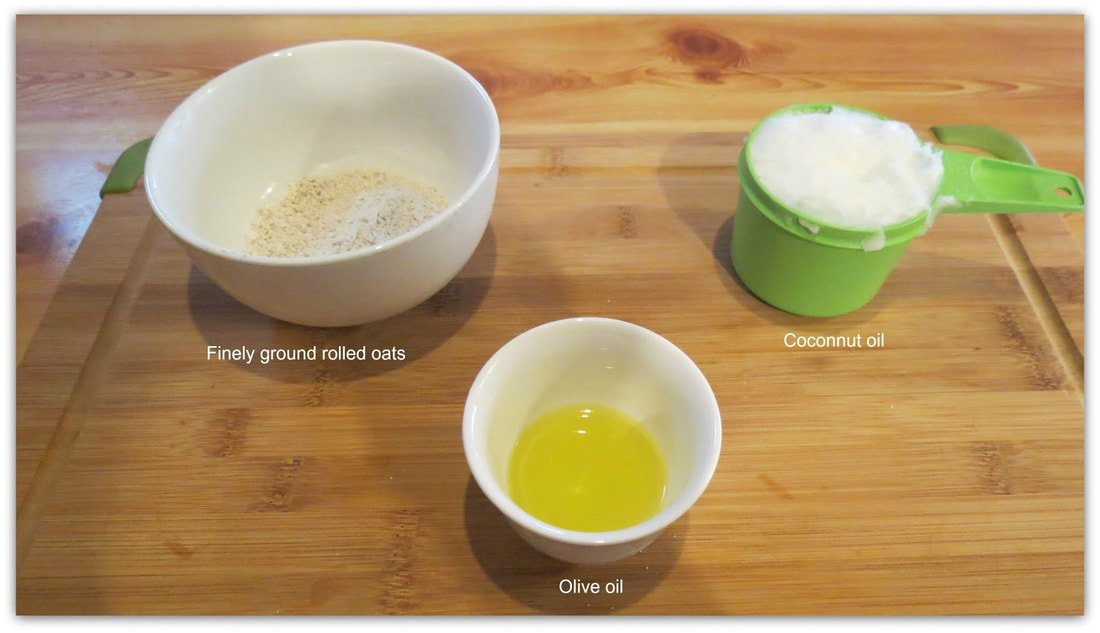 Oats have been used to soften and moisturise skin for centuries. They are know for their anti-itching properties and are an easy treatment for dry skin. Coconut oil is rich in fats, Vitamin E, proteins and fatty acids. It is renowned for it's moisturising and anti-aging properties. Because coconut oil doesn't go rancid it can be applied to the skin it can work longer without going rancid. Rosemary oil is know for it's therapeutic properties and is a common ingredient in shampoos and moisturisers for it's purifying properties. This recipe can be used as a daily skin moisturizer to prevent eczema from flaring up. If by chance it does still appear this helps to nip it in the bud quickly! You will need: 1/4 cup of oats 3/4 cup of coconut oil Few drops of rosemary oil* (optional) 1 tbsp of olive oil A small jar with a screw top lid, sterilised Step 1. Finely grind the oats to a powder/flour consistency and set aside. I use my food processor but you can use a stick blender, vitamiser, mortar and pestle (if you have the muscles), a Magic Bullet - any appliance that will grind the oats into a fine powder. 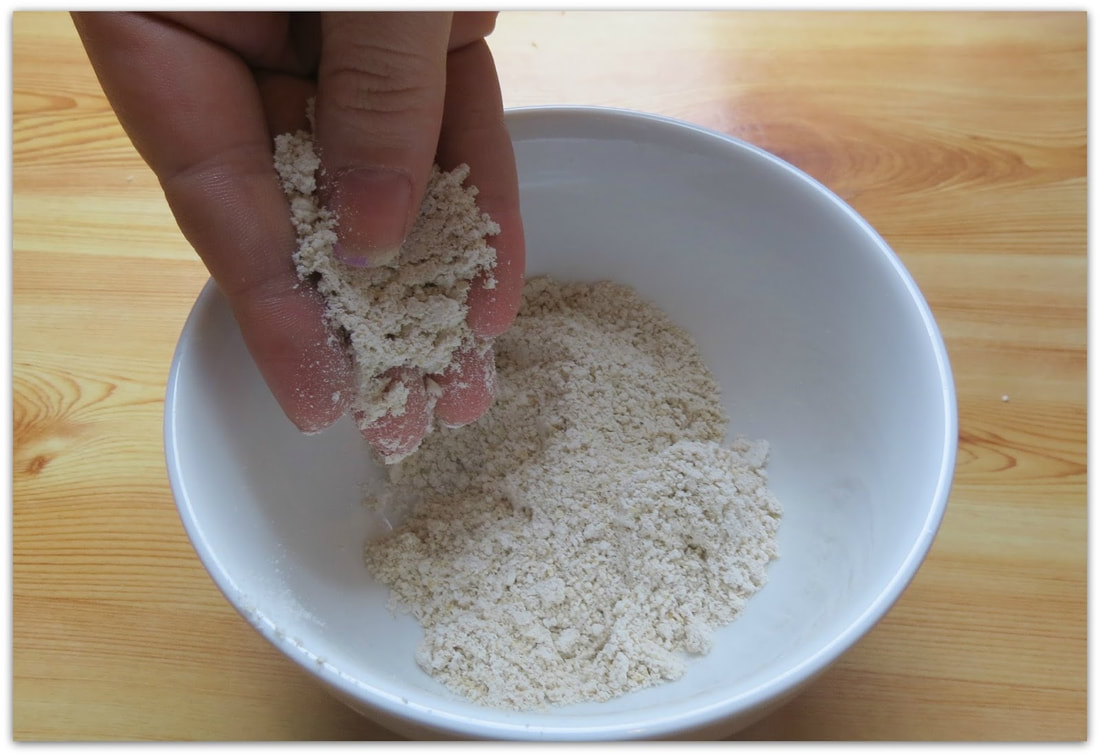 Step 2. Over a low heat, melt the coconut oil in a small saucepan until it melts.
Step 3. Add in a few drops of rosemary oil if you are using it. I usually add 8 drops as we like the fragrance and I like the antibacterial properties of rosemary oil. Step 4. Add finely ground oats to the saucepan and mix until well blended. At this stage the mixture will be quite thin. Step 5. Now, pour the olive oil into the mixture and stir until blended. Step 6. Once all ingredients are thoroughly combined remove from the heat and let it cool, absorbing all the goodness from the oats. While it is still semi-liquid pour in to a small, sterilised storage container. It won't matter if you get any of the oats in the jar, your cream will just have a little texture. If you don't want any oats, strain the liquid into the jar. Let it cool and harden for several hours. Apply to hands and skin as needed and feel the moisturising magic at work! From Debt Free Cashed Up and Laughing  Here is an idea to vamp up Easter and give a new look treat to friends and family that you are able to put your own twist on!
You will need: Ice cream cones or waffle cones Chocolate Easter ornaments Lollies of your choosing Mini chocolate eggs Cellophane Curling ribbon Step 1. Fill your cone ¾ of the way full with your lollies. Step 2. Put your chocolate on top of the lollies (you can put more lollies around it to help stabilize it). Step 3. Next you take your mini eggs and fill the cone the rest of the way. Step 4. Wrap your cones in cellophane and tie with curling ribbon so they look like a “carrot”. Note: You may need help with making these so you can use an ice cream cone holder or another person to hold them for you. All of this will cost you around $1.10 - $1.20 per cone. From the Special Occasions: Easter Tip Store  Grow your own. It's not really hard and can be so satisfying. When tomatoes are $5/kg and you have bushels of them on your plants you'll have a smile on your face.
You don't need to have huge garden beds and spend hours and hours in the garden. You can start with a styro foam box (ask your greengrocer, just don't tell him you're going into the grow your own business). Plant lettuces, tomatoes, carrots, strawberries, silverbeet, capsicums, eggplant, parsley, mint, chives - whatever you eat - in these boxes and sit back and watch your savings grow. Visit the Gardening Tips pages in the Menber's Centre to get some expert advice on just how to get started and then jump right in, just like Deb Parker did. "Since I mastered the art of pot gardening last summer I have managed to keep my family (five of us) in vegetables all year. The only veggies I have bought for twelve months have been potatoes and onions. I started with two concrete pots with tomatoes in them and have moved on. I now have 49 concrete pots of varying sizes placed around the sides of our house and each one has something growing in it. Oh, I didn't buy the pots. I looked up our council hard rubbish calendar and on the first day of each hard rubbish collection in our bordering areas I spent an hour driving around collecting pots. I haven't had to buy any. I cleaned them and painted them inside and out before planting, to help them retain the moisture. They look great and better still they are saving me money." Contributed by Deb Parker  I frist made this cough syrup about six years ago when I had pleurisy and couldn't take a step without gasping for breath.
It was easy to make, and because it's completely natural, made with everyday food items, I could sip a spoonful as often as I need to. I wasn't limited to 10mls every six hours as I would have been with the chemist's mixture. It's been used regularly since then, for me and the rest of the family. This syrup has coconut oil in it. I love coconut oil and use it for all sorts of things. I substitute it for oil or butter in baking. I use it as a spread on bread or crackers (try it with a little raspberry jam on fresh bread - yum!). I use it as moisturiser and a cleanser. It makes a wonderful overnight hand and nail treatment, just rub it in and pop on some gloves (or clean socks).It is a major ingredient in my cough syrup. Coconut oil is rich in antioxidants and contains lauric acid, which is anti-bacterial and anti-viral. Coconut oil can be used to help prevent colds by boosting the immune system, speeding recovery. The lemons I use are home grown and so organic. No pesticides used in my garden. Lemon is full of Vitamin C, but did you know it's also full of anti-bacterial and anti-viral properties? That's why lemon juice makes a great ingredient in cleaning products. It's also why it's an essential ingredient in my honey lemon cough syrup. I use Manuka honey in this cough syrup. Ideally if you don't have Manuka, you'd use raw, local honey. Local honey will ease allergies too - a teaspoon or two a day for a week before the start of the Spring pollen/hayfever/allergy season will boost your immune system and ease, if not completely alleviate, your symptoms. But it must be local honey to combat local pollens. Honey is also antibacterial and very soothing for sore, dry throats. Clinical studies have shown honey to be just as effective a cough remedy as any over-the-counter cough medicine. Honey Lemon Cough Syrup Ingredients: 100ml freshly squeezed lemon juice 1/4 cup local raw honey (or Manuka honey if you have it) 2 tablespoons coconut oil Method: Mix all the ingredients together in a small saucepan. Heat over a low flame until coconut oil is melted, stirring all the time. This doesn't take long - just a couple of minutes. Stir to combine everything into a syrup. Pour into a clean jar. When the syrup cools the coconut oil will solidify again. Just warm the syrup over boiling water before using it. Keep it in the fridge for up to a month. To use, take warm syrup by the teaspoonful as often as you need to. There's no fear of overdosing, there's nothing in it that will cause you any harm.  This Irish soda bread is just perfect for a hearty morning tea or an after-school snack for hungry kids. It is best eaten fresh, but leftovers (if you have any) are delicious thinly sliced, lightly toasted and topped with honey.
Ingredients: 4 cups plain flour 1 cup white sugar 1 tsp bicarb soda 2 tsp baking powder 1/2 teaspoon salt 3 eggs 500ml sour cream 2 tbsp buttermilk 1 cup currants (in a pinch I've used sultanas, but currants are best) 1 tsp caraway seeds - traditional, but optional (I never add them, I don't use them for anything else) Method: Preheat oven to 160 degrees Celsius. Grease two 20cm x 10cm loaf tins and line the bases with baking paper. Mix the flour, sugar, bicarb soda, baking powder and salt. Add the eggs, sour cream, buttermilk, currants and caraway seeds. Mix until just combined. This will be a very thick, very lumpy batter. Distribute batter evenly between the two pans. Bake loaves for 1 hour or until nicely browned. Do not over bake. Best served immediately with butter.  I had the pleasure this afternoon to chat for a few minutes with Darren James who was hosting Afternoons with Dennis Walter on radio 3AW here in Melbourne.
I was thrilled to be able to talk about everyday things that are overpriced. Darren mentioned hairdressing and I agree, hairdressing can be very expensive. I get my hair cut and dried at a local salon for just $27 and in all the years I've been going there I've only been unhappy twice. Thankfully my hair grows very quickly so I wasn't sad for too long. He also mentioned parking and I agree with him there too. Parking fees are outrageous. Whether it is in the city or at the airport or even our local hospital parking can eat up a huge chunk of your daily budget. I've had reason to visit Box Hill Hospital here in Melbourne weekly for the last couple of months and the parking was sending me broke - $7 minimum each visit. These days I get dropped off and just call when I'm ready to be picked up. My chauffeur brings a book and a drink and parks a few streets away, where it's not only free but far less congested. I mentioned bottled water. Everyone who knows me knows how I feel about paying for water in a plastic bottle. We have a very cheap, clean and safe water supply here in Australia so buying bottled water is a complete waste of money. Tap water costs you just one tenth of one cent per litre. Bottled water can cost over $5 per litre! Fill your water bottles from your kitchen tap and you'll save around $844 a year. For my family that's almost three months' grocery money. It's 15 months of mobile phone access for Wayne, Hannah and me. $844 is 21 weeks of petrol for my car (I budget and use around $40 a week at current prices of $1.44.9/l). And if those figures don't convince you think about this: we pay $1.45 or more per litre for petrol and whinge and whine about it, while we pay three, four or more times that price per litre for water and gloat because we're drinking plain water! Bottled water is not just expensive, the cost truly is outrageous. Coffee pods are another thing that are very expensive. Aldi pods are $5.99 for 128g or $4.67/100g. I can buy coffee beans from Coles and grind my own coffee for a fraction of the price. Coles Fair Trade coffee beans are the cheapest at just $1.30 per hundred grams. My favourite Lavazza beans cost $3.37 per hundred grams, almost half the pod price, off the shelf and less than half price when they are on sale. And if you're not convinced or really love your pods, you can refill them with your own ground coffee. I'll post a How To later in the week showing you how, but it is really easy. So many of the things we buy are overpriced and yet we still buy them. We may be aware they are overpriced and we may grumble and moan about the cost but we still buy them. We don’t have to. We can stop using those products. We can find MOOs to replace them. We can look for cheaper, better value alternatives. We don't need to be swept up in the advertising hype that has us believing that only those over-priced products will make us happy. What outrageously priced items do you buy? What outrageously overpriced items do you leave on the shelf because you've found a cheaper alternative? From Debt Free, Cashed Up and Laughing  This cake came about because until the kitchen renovation is complete, I don't have a working oven. I saw this pie maker in Kmart for $15 and decided to try it to make a meat pie for our dinner. I figured if it didn't work, then it was only $15 I had wasted.
As Hannah says "best $15 spent ever!" So far we've made pies, quiches and cakes. One of the cakes I tried was a pineapple upside down cake. I found the recipe in Mum's recipe book, and of course adapted it to suit my style of baking (and the pie maker!). It turned out perfectly, and one recipe makes two cakes, one to eat and one to freeze (yes, it freezes!). Ingredients: 1 vanilla cake mix 2 eggs 30ml vegetable oil 3/4 cup water 3-1/2 pineapple slices in juice, drained and let dry a little on paper towel glace cherries 4 tbsp brown sugar 1tsp butter Method: Line the base of the pie maker with baking paper. This isn't necessary for baking pies, cakes or quiches as a rule, but this recipe makes a toffee, so it's easier to tip the cake out if the base is lined. Sprinkle the brown sugar over the baking paper. Dot with the teaspoon of butter. Keep one pineapple ring whole, and cut the others in half. Arrange them over the brown sugar. Put a cherry in the centre of each piece of pineapple. Turn the pie maker on to start heating. Beat the cake mix, eggs, oil and water until smooth. Pour 1 cup cake batter evenly over the pineapple. Smooth it over, if you think it needs a little more batter, add another 1/4 cup. Close and clip the lid. Cook for 10 minutes. Turn off the pie maker and let the cake sit with the lid closed for 5 minutes. Carefully turn the cake out onto a cake rack to cool. Watch me make Pineapple Upside Down Cake live. |
Archives
April 2020
Categories
All
|


 RSS Feed