THE CHEAPSKATES CLUB
  • Home
  • Join the Club!
    • Twenty Reasons to Join the Cheapskates Club
  • About Us
    • Cath's Story
    • Ask Cath
    • Glossary of Cheapskating Terms
  • Forum
    • Current Forum Discussions
    • How to Use the Member Forum
  • Inspiration
    • Getting Started
    • 31 Days of MOO Index
    • Articles
    • Housekeeping Routines
    • Budget Renovations
    • Saving Stories
    • Learning Centre
  • Recipes
    • Recipe File Index
    • Meal Plans
    • Add a Recipe
    • $300 a Month Food Challenge >
      • $300 a Month Food Challenge
      • The $300 a Month Food Challenge Forum
  • Newsletters
    • Newsletters 2023
    • Newsletters 2022
    • Newsletters 2021
    • Newsletters 2020
    • Newsletters 2019
    • Newsletters 2018
    • Newsletters 2017
  • Saving Money
    • Latest Tips 2023
    • Latest Tips 2022
    • Cheapskates Tip Store
    • Tip Sheets
    • Top Tip Competition
  • Contact
    • Changing Details
    • Help Files

Make a Cloth Shopping Bag

25/6/2018

0 Comments

 
Now the supermarket plastic bag ban is in place here in Victoria, shoppers are going crazy trying to decide what they're going to use, not just for the groceries, but for bin liners (that seems to be the biggest re-use of plastic grocery bags).

I've used cloth bags since Aldi opened. Don't get me wrong, I too use plastic bags for bin liners, but the come from  other stores (fruit and veg, butcher, department stores) or they're given to me.

I also use cloth bags I've made. They're easy, cheap and usually very sturdy. Buy the calico or denim or homespun on sale, or recycle it from shirts, jeans, skirts, dresses you no longer wear to save money. 

You can buy plain calico totes at craft stores, they're not expensive, if you don't think you can make them.

Here are the instructions for a couple of bags I made a couple of years ago. The instructions use bought bags, but by all means make them if you can. 
Picture
Vintage Rose ToteYou will need:
Calico or plain coloured cotton tote
A picture to fit the tote
Iron-on transfer paper*
Iron
Pillowcase

Step 1. Wash and dry your bag. I like to pre-wash the bags so that if they shrink they'll do so before the transfer is applied. Iron it.

Step 2. Find an image to use as the transfer. I found this image here:  http://www.freeprettythingsforyou.com/ Make sure it is going to fit onto your tote. I usually print the image then use it as a template to work out the placement of the actual transfer.

Step 3. Follow the instructions on your transfer paper to print then apply the transfer to your tote.

And voila - in around 30 minutes (more if you can't make up your mind about the image) you have a lovely and unique tote to use or give as a gift for around $6.​
Picture
This is a tote with an embroidered pocket. I embroidered the piece of fabric for the pocket (it only took a few minutes using the sewing machine) and then attached the pocket to the front of the tote. You'll need a sewing machine with a free arm for this or you'll need to unpick the tote, attach the pocket and re-stitch the seams.

*Spotlight and Lincraft sell iron-on transfer paper, but it's expensive. Buy it on sale (at least 40% off to make it cheap enough). You can also get it at Officeworks, where the packs are bigger, bringing the price per sheet down. Again, wait for a sale if you can. I have found it in some $2 shops too and it seems to be just as good a quality for a fraction of the price.
0 Comments

Tip of the Day: Simple Christmas Baubles

23/10/2017

0 Comments

 
Picture
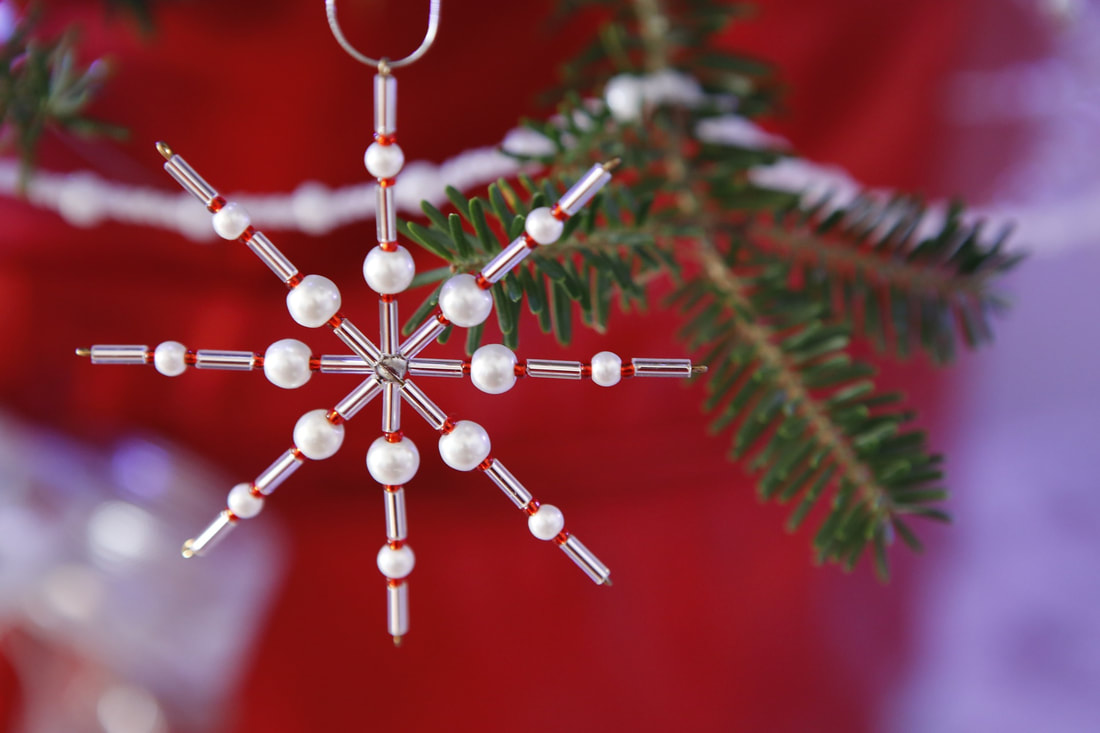
You can make really pretty and unique baubles for your Christmas tree with just sewing thread, paperclips and two or three different, recycled gaudy necklaces made of large beads. Just string one large bead with two, three or five large ones and use a paperclip to hang them on the Christmas tree. You'll find a wonderful assortment of necklaces at any op shop for just $1 or $2 each and you'll get a lot of ornaments from one necklace.
0 Comments

How to Make a Willow Wreath

18/9/2017

0 Comments

 
Picture
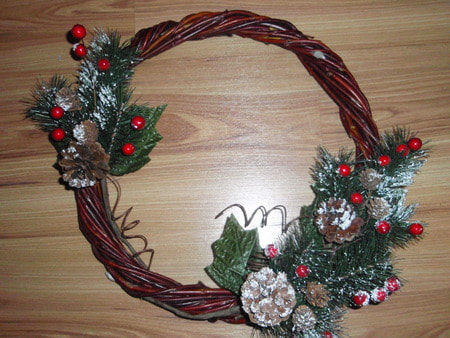
Willow wreaths are so easy to make and they look lovely, either as they are or decorated. I use small willow wreaths to decorate our Christmas tree. If you want to use them for the same thing, you need to make them now so they have time to dry.

To make a small willow wreath, approximately 5cm in diameter you need one long or two short willow strands.

Step 1. Strip the leaves from the strands.

Step 2. Take one strand and twist it into a small circle. Weave one end around the circle to secure.

Step 3. Take the other end and weave it in and out of the circle until you reach the end.

Step 4. Tuck the end into the weaving to secure. 

Step 5. Lay the wreaths on several thicknesses of newspaper and place them in a warm, dry spot (in front of a sunny window is ideal). Turn the wreaths every day or so. Leave them for a month until they have dried.

To decorate use craft paints to spray them gold, silver or red. Use a hot glue gun to stick berries, flowers, bows or other embellishments. Cut a 10cm length of narrow ribbon. Fold in half and glue raw edges to the back of the wreath. Let the glue dry then hang by the ribbon.

Where to find willow:  Weeping willows grow all over the place. They were once very common but have fallen out of favour due to their creeping and invasive roots. You'll still find them in parks and along creeks and waterways, or even along the side of a country road.  I make Wayne stop at the picnic area between Goulbourn and Yass every time we are coming home from Sydney so I can collect a few more willow strands (the willows are on the southbound side of the freeway, which is why we stop on the way home). If the willow is on private property ask permission before taking just the number of strands you need to make your wreath. 
0 Comments

10 Ways to Reuse Egg Shells

1/8/2017

4 Comments

 
Picture
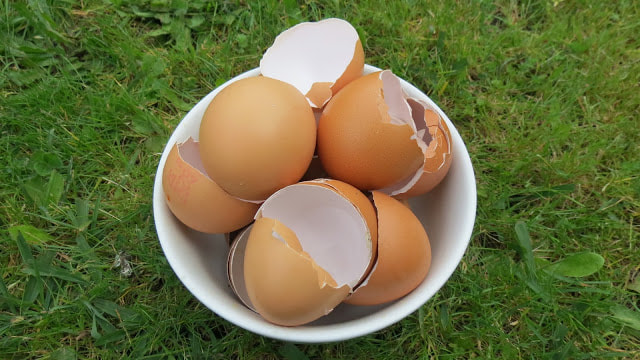
To most people an egg shell would be rubbish, tossed in the bin and sent to landfill. Some keen gardeners may compost them or use them as snail repellent. Folk with chooks may grind them and add them to their chook's food as shell grit. But most people just toss them.

I have a little dish that sits on the sink and whenever we use an egg, the shell gets rinsed in cold water and then put into the dish. When I need egg shell for something, it's right there, ready and waiting to be used.

Egg shells are surprisingly useful. Here's a list of 10 ways I use egg shells around our home.

1. Use egg shells to whiten and soften linen. Soak greying linens in boiling water with the juice of a lemon and two or three ground egg shells added. Let them soak overnight, then rinse and hang in the sun to dry. The linens will be white and soft, no nasty chemical whiteners or softeners needed.

2. In the garden to keep snails and slugs off seedlings. Just crush the egg shell and sprinkle it around the tiny plants. Snails and slugs won't travel over the sharp edges so your plants will be safe - from those predators at least.

3. Add them to chook food. Egg shells are a great source of calcium and grit, two things hens need to produce nice health eggs. Wash the egg shells and when you have a few grind them, either in a blender, with a stick blender or with a mortar and pestle and add it to the chook food.

4. Boil the shells in your coffee. At home we have a coffee maker but when we're camping we use an old fashioned stove top percolator. Adding egg shells to the percolator with the coffee grounds takes away the bitterness than can happen when coffee is boiled accidentally.

5. Use them to feed tomato plants. Calcium rich, crushed egg shell is a good source of this mineral for tomato plants. Tomatoes need calcium to prevent blossom end rot, a common tomato problem. Put a couple of egg shells in the hole before you plant your tomato to give it a boost. Then through the growing season grind egg shells, sprinkle them around the base of the tomato and water in.

6. As tiny seedling starters. Rinse out the egg shells, poke a couple of tiny drainage holes in the bottoms and fill with potting mix. Plant your seeds and when they are ready to be transplanted, gently squeeze the egg shell to crack it and then plant it intact in the ground. 

7. Compost them. Nothing more needs to be said.

8. You don't compost? No problem, crush them, sprinkle over the soil and then lightly rake them in. 

9. Turn them into ornaments. Rinse them well and let them dry. Then let your creative streak go to town. Paint them, add glitter and sequins, fill them with cotton wool, add little tiny ornaments, cover them with braid, glue on a ribbon hanger - use your imagination!

10. Add them to the bird feeder. Crush them up and mix in with the bird seed to give the wild birds that visit your garden a treat.

So how do you use egg shells? Share your idea in the comments below
Shared from Debt Free, Cashed Up and Laughing
4 Comments

Scosies

26/6/2017

1 Comment

 
Picture
One of the things I love about living the Cheapskates way is the challenge to re-purpose things. Sometimes it's things we no longer use, often it's things we have never used but have in the house, just waiting for a purpose. 

Over the years I have collected a lot of vintage linens and I love to turn them into things I can use, things that make me smile and make our lives as a family just that little bit more comfortable. 

Today I made a scosie from a lovely old tea towel. I have been waiting for the perfect project for this tea towel and the scosie was it. 

A scosie is a scone cosy, a simple way to keep fresh scones warm while on the table. After all scones with jam and cream go much better when the scones are warm.  You can use new tea towels, but vintage tea towels add a charm that new fabric just doesn't have. Waffle weave or toweling tea towels will keep the scones warm until the last bite. For a prettier scosie use printed cotton or even tulle and lace. 

To make a scosie:

Step 1. Use a dinnerplate to trace 2 circles onto your fabric. Cut around the edge of each circle.

Step 2. Finish the raw edge of each circle with bias binding. Add any lace or ric rac embellishments. 

Step 3. Use tailors chalk (or a very light pencil) to divide one circle into six wedges.  Place the marked circle on top of the second circle. Sew along the lines. 

Scosies make a lovely gift, especially if you fill them with scones and present them on a vintage plate.

Shared from Debt Free, Cashed Up and Laughing
1 Comment

31 Days of MOO: Hanging Herb Garden

8/3/2015

0 Comments

 
Take that old shower caddy and put it to good use as a hanging herb or succulent garden. 

After our bathroom renovation I had a spare shower caddy, just taking up space and doing nothing useful. I thought about hanging it over the tap in the backyard to hold soap for handwashing then saw a picture of one being used as a hanging basket. 

You will need:
1 hanging shower caddy
Potting mix
Herb seedlings
Coconut fibre

Step 1.  Line the basket/s of your shower caddy with coconut fibre. Make sure it is at least 2cm thick and covers the entire basket area. It has to hold potting mix and seedlings.

Step 2.  Fill the baskets with potting mix and water. Plant your seedlings.

Step 3.  Hang your basket against a wall, off a verandah railing or from the fence. 

You'll be growing your own fresh herbs and repurposing something that would otherwise have gone to landfill. Oh, you'll save money on a hanging basket or pot too. 
0 Comments

Making the Switch to Cloth Serviettes

11/2/2014

0 Comments

 
Picture
One of the first things to go when we started living this Cheapskates lifestyle was paper products - paper towel, tissues and serviettes.

I hadn't realised just how expensive those paper products really were. With three littlies in the house, a messy cook (that would be me!) and a husband who worked hard and enjoyed messy hobbies I thought paper towel, serviettes and tissues was the only way to cope with the messes.

When our grocery budget went down to $200 a month they had to go. Even though I was shopping at Jewel (remember Jewel, the no frills grocer?) and had switched to no name paper products they were still too expensive.

Once the paper towels went I realised we were still using paper serviettes. While they were a little cheaper I was going through them faster because they made good paper towel substitutes.
An aunty of mine once told me she couldn't possibly eat a meal with out a serviette, sometimes two or three, depending on how “messy” the meal was. Unfortunately I am a bit the same, I like to have a serviette handy just in case and I used to go through a couple of packets of paper napkins a month.

While they weren't particularly expensive, 99 cents for 200, they did help to fill the rubbish bin and there were times they actually found their way into the washing machine and made my life miserable.

When we went paperless I decided enough was enough and fabric serviettes were the way to go. I did some research and found that they didn't have to be washed after each meal, but instead could be personalised to be used a number of times (unless they were particularly grotty). I was sold.

I worked out that I would need at least two dozen to cover accidents, washing, visitors etc. To buy twenty-four fabric serviettes was going to cost a bit so I started looking around the house for alternatives.

During my younger, richer, single days one of my passions was old linen and over the years I managed to gather quite a collection of tablecloths, serviettes, doyleys, pillowcases, antimacassars and tea towels. The tea towels, tablecloths and pillowcases were perfect to rejuvenate and turn into serviettes.

They were really easy to make, just fabric cut into squares and hemmed. Simple! In one afternoon I was able to make twenty-four serviettes and we have been using them ever since.

I calculate that using fabric serviettes for the last 19 years has saved us $451.04! That's almost six week's grocery budget or to put it another way three days Wayne doesn't have to work!

If you are not a confident sewer, try these instructions.

You will need:
*Fabric – pillowslips, sheets, shirt backs, tea towels, even your favourite dress can be cut up and recycled
*Scissors
*Tape measure
*Pins
*Thread
*Sewing machine or needle
*Iron and ironing board

Instructions:
1. Measure your fabric into 40cm squares and cut them out.
2. Once you have your squares cut out, stitch around the fabric 6mm from the edge.
3. Fold the fabric over along the stitching line and press down.
4. Carefully fold over again, making a double fold.
5. Press and pin in place.
6. Stitch, either by hand or machine, all the way around the edge to hem the fabric.
 
And that's it. You have just made your serviettes.

The switch to fabric serviettes took a bit of work and a little getting used to but it has been worth it, on so many levels. Cloth napkins add a little formality to meals. We all seem to sit a little straighter, use our manners more and spend more time at the table enjoying each other's company. Will we ever go back to paper serviettes? No. I like the fabric napkins. I like that I can swap them around to suit the table setting. They are easy to launder, they just go in the wash with the whites and line dry. I fold them straight off the line and put them into the drawer immediately. They're not really any extra work.

From Debt Free, Cashed Up and Laughing
0 Comments

ZERO WASTE

1/6/2011

2 Comments

 
Picture
It's such a bright, sunny day I ventured out early this morning and put the washing on the line, rather than over the clotheshorse. I may as well take advantage of the "solar" clothes dryer while it's there. I know that the heavy things will still be damp when I bring them in, but that's ok. I love the smell of washing that's been outside drying in the sun, even if I have to finish it off in front of the fire.
​
Speaking of which, we can't use ours at the moment and boy do I miss it. We have had the ducted heating on in the evenings and it's just not the same as the fire.  The top of the chimney/flu has come off, we think by one of those absolutely huge magpies that have been bombarding our roof for weeks. Wayne will get up at the weekend and have a look and make the necessary repairs and it will be back in action.

It's the first of the month and as I was uploading the Journal last night I was thinking about the challenge I've set for Cheapskaters this month. Zero waste. Is it possible to go a whole month and have zero waste? I wonder. I think it is, you just need to think ahead and be conscious of your goal all the time.

I think it will be easy to have zero waste in the kitchen. We already compost (we have a bokashi bucket), anything that can't be composted is either re-used or re-cycled. Yes, I'm one of those freaks who re-use foil time and time again and store everything in Tupperware or similar containers. I wash and re-use ziplock bags, glass jars, bottles, paper bags and pill bottles (we have a few of those since Wayne's been unwell).

Leftovers are either planned or eaten.  I can put a plated up dinner in the fridge for another meal and it will disappear overnight.  We have fridge fairies that visit our fridge during the deep, dark hours of the night.  I'm sure we're not the only family they visit, I just wish they'd call ahead first so I can plan to lose the dinner I'd planned on having the next day.

I was reading Amanda's comments on the Zero Waste Challenge thread in the forum and it brought back so many memories, especially the watching water usage.  I remember bucketing the bath and shower water into the washing machine too. Thankfully the bathroom was off the laundry, so not to far to carry the water. And re-using courtesy of the suds save option on the washing machine over and over again. 

I'd do the whites first, then the light coloureds, coloureds, dark clothes and then the dirty farm clothes. Sometimes I'd have to top up the water, but not often. When the washing was finished it was carried out to the trees and garden.

Wayne would mark the tank every day so we could show the kids how much water we used. It was a competition to see how much water we didn't use each day. Now that really was zero waste.

I challenge you to join us. This week we're focusing on zero kitchen waste and you can join us here.

From Debt Free, Cashed Up and Laughing
2 Comments

    Archives

    May 2020
    April 2020
    March 2020
    February 2020
    January 2020
    December 2019
    November 2019
    October 2019
    September 2019
    July 2019
    May 2019
    April 2019
    March 2019
    February 2019
    January 2019
    December 2018
    October 2018
    September 2018
    August 2018
    July 2018
    June 2018
    May 2018
    April 2018
    January 2018
    November 2017
    October 2017
    September 2017
    August 2017
    July 2017
    June 2017
    May 2017
    April 2017
    March 2017
    March 2016
    November 2015
    September 2015
    August 2015
    July 2015
    June 2015
    May 2015
    March 2015
    February 2015
    January 2015
    October 2014
    September 2014
    August 2014
    July 2014
    May 2014
    April 2014
    March 2014
    February 2014
    October 2013
    August 2013
    July 2013
    May 2013
    February 2013
    December 2012
    November 2012
    October 2012
    September 2012
    August 2012
    July 2012
    June 2012
    May 2012
    March 2012
    February 2012
    December 2011
    November 2011
    October 2011
    September 2011
    July 2011
    June 2011
    April 2011
    March 2011
    February 2011
    December 2010
    September 2010
    June 2010
    May 2010
    March 2010
    February 2010
    March 2009

    Categories

    All
    $2 Dinners
    $300 A Month Food Challenge
    BBQ
    Beauty
    Bread
    Breakfast
    Budget
    Cakes
    Centrelink
    Children
    Christmas
    Cleaning
    Cooking
    Craft
    Crochet
    Debt Free Cashed Up And Laughing
    Debt Reduction
    Desserts
    Drinks
    Easter
    Electricity
    Entertainment
    Family
    Finances
    Financial Help
    Gardening
    Gift Ideas
    Gluten Free
    Groceries
    Grocery Bduget
    Grocery Shopping
    Handmade Christmas
    Health
    Holidays
    Homemaking
    Kitchen
    Laundry
    Leftovers
    Living The Cheapskates Way
    Meal Planning
    Meatless Meals
    Mixes
    MOO
    Mother's Day
    Natural Remedies
    No Bake
    Organisation
    Pancakes
    Pie Maker
    Preserves
    Preserving
    Pressure Cooker
    Price Book
    Real Estate Selling
    Recipe File
    Recycling
    Saving
    Sewing
    Shopping
    Shopping List
    Snacks
    Special Occasions
    Stockpile
    St Patricks Day
    Tip Store
    Valentine's Day
    Vegetables
    Want Not
    Waste Not

    RSS Feed


Getting Started

Tools & Guides

Follow Us

Cath's Story
You Really Can Live on One Income
Join the Club!
Site Information
Contact
Begin here
Newsletter Archive
Journal Archive
$300 a Month Food Challenge
Forum
Cheapskates Tip Store
Cheapskates Recipe File
Tip Sheets
Facebook
YouTube

Copyright ©2001 - 2023 The Cheapskates Club, All Rights Reserved
  • Home
  • Join the Club!
    • Twenty Reasons to Join the Cheapskates Club
  • About Us
    • Cath's Story
    • Ask Cath
    • Glossary of Cheapskating Terms
  • Forum
    • Current Forum Discussions
    • How to Use the Member Forum
  • Inspiration
    • Getting Started
    • 31 Days of MOO Index
    • Articles
    • Housekeeping Routines
    • Budget Renovations
    • Saving Stories
    • Learning Centre
  • Recipes
    • Recipe File Index
    • Meal Plans
    • Add a Recipe
    • $300 a Month Food Challenge >
      • $300 a Month Food Challenge
      • The $300 a Month Food Challenge Forum
  • Newsletters
    • Newsletters 2023
    • Newsletters 2022
    • Newsletters 2021
    • Newsletters 2020
    • Newsletters 2019
    • Newsletters 2018
    • Newsletters 2017
  • Saving Money
    • Latest Tips 2023
    • Latest Tips 2022
    • Cheapskates Tip Store
    • Tip Sheets
    • Top Tip Competition
  • Contact
    • Changing Details
    • Help Files