 Greeting cards - birthday, get well, sympathy, new baby, thank you and so on, are expensive. Even from the $2 shops these days they are, well $2! It used to be you could get five cards for $2, then it was four for $2, then they were $1 each, and now you pay $2 for a very simple, very boring cheap card.
You don't need a lot of special equipment to make cards, and you don't need a lot of fancy papers and stickers and other embellishments. And best of all, you don't need a lot of time. In just ten minutes, you can make four beautiful cards, for less than the price of one from a $2 shop. Best of all you can make them to suit the recipient by personalising the greeting, the colour, the embellishment. To make these four gorgeous cards in under 10 minutes you will need: 4 coloured card blanks (4) 5-1/4" x 2-1/4"" black cardstock (4) 5-1/4" x 2" white cardstock 3/4" Circle punch Small hole punch Sentiment stamp Ink pad Adhesive Step 1. Take the black cardstock and using the 3/4" circle punch, punch out 7 circles, leaving a narrow border. Punch 5 small dots from the remaining black cardstock. Step 2. Stick the white cardstock to the black cardstock, being sure to hide the holes. Step 3. Stick the black and white cardstock to the card base, leaving a narrow border at the top and sides. Step 4. Lay out the black dots. When you are happy with the pattern, stick them down using tape runner or liquid glue. Step 5. Stamp your sentiment to the bottom left corner of the card. Step 6. Stick the small dots to the bottom right of the sentiment. Repeat for the remaining three cards.
0 Comments
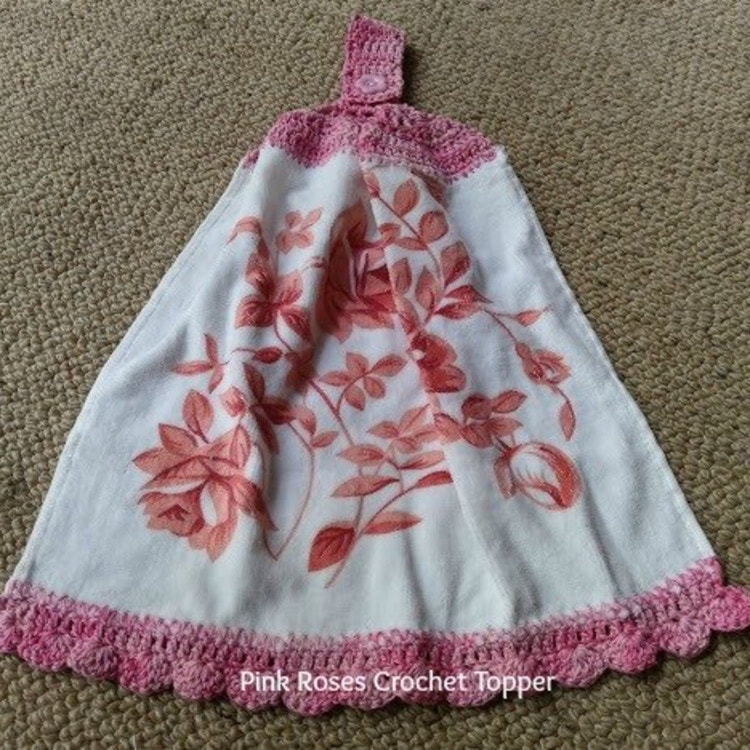 This is a very quick and easy topper to add to a hand towel. I love to give them as gifts, sometimes with a bar of homemade soap, sometimes with a knitted dishcloth.
You will need: 1 tea towel, cut in half (you get two hand towels from the one tea towel) Crochet cotton to match 3mm crochet hook Hem the raw edge of the tea towel. Work a row of chain along the top edge of the tea towel. This is your foundation row. Row 1: Ch. 3, skip one chain, work 1 tr.t in each chain to end of row. Turn. Row 2. Ch. 3, skip one tr, work 1 tr. in every second tr. to end of row. Turn. Row 3. Ch. 3, skip one tr, work 1 tr. in every second tr to end of row. Turn. Continue in this manner until 5 treble remain. Turn. This forms the "handle" of your towel topper. Work 1 tr. In each chain to end. Turn. Continue in this manner until handle measures 10cm. Next row: Work 1 tr. In first four chain, ch. 2, skip 2 tr., work 4 tr. In next four chain. This forms the buttonhole. Next row: Work 1 tr. In each ch. to end. 10 tr. Turn. Repeat this row twice. Cast off. Sew button in place. Your towel is finished. Notes: The towel in the photo cost $1.50 to make. I buy handtowels and pretty tea towels from $2 Shops, on sale at Kmart or Big W and sometimes from the op shop if they are in very good condition (i.e. new). Supermarkets often have lovely tea towels, but wait until they come on sale for $2.50 each or less. From Debt Free,Cashed Up and Laughing  Pretty cups and saucers can be used for more than just afternoon tea. This candle in a tea cup is gorgeous, and cost almost nothing to make. I used a 50 cent cup and saucer from my favourite Op Shop, a candle we already had that was a little out of shape, a length of cotton string from the kitchen drawer and a few drops of lavender essential oil to scent it. They are quick to make too, about 15 minutes all up. This candle cost me 50 cents. I saw a similar thing at Coles yesterday, in their Mother's Day display, for $11! A Candle in a Tea CupYou will need: 1 tea cup and saucer 2 or 3 coloured candles Cotton string (or a candlewick if you have one) Your favourite essential oil Hot glue gun An old fruit tin or similar for melting the candles A large saucepan Step 1. Using your hot glue gun, glue the cup to the saucer. Step 2. Break your candles into smallish pieces. Put them in the fruit tin. Fruit tins are ideal for this step as you can throw them away when you are finished. If you do use a saucepan, don't use one of your favourites or you'll be cleaning it for ages. Wax is very difficult to remove completely. Use a fruit tin and avoid the stress (and the work). Step 3. Sit the fruit tin in a large saucepan. Fill it with water to about half way up the side of the fruit tin. Bring the pot of water to the boil, all the while stirring the melting candles. Once the water is boiling, turn it down to a simmer. Continue to stir the candles as they melt. Step 4. Cut a length of string twice the height of your cup. Dip the string into the melted wax a couple of times to stiffen it. Step 5. Carefully pour a tiny blob of melted wax into the bottom of the tea cup. Stick one end of the wick to the bottom of the cup. Step 6. Holding the wick straight (you might need someone to help you here) fill the cup to the brim with the melted wax. As the wax cools it will form a slight dip in the centre. Melt any remaining wax and fill the dip. Add embellishments to the rim of the cup, the handle and/or the saucer if you wish to. Platinum members can login for full access to the Tip Store
Not a Platinum Cheapskates Club Member? Please upgrade to a Platinum Cheapskates Club membership to be able to access our Member's Centre. Click here to upgrade your Cheapskates Club membership today  I loved school holidays. Having the kids home was pure joy for me. It not only gave me an extra couple of hours in my day (no school runs), but our days were relaxed and easy. I planned easy meals, didn't fuss too much about tidying up toys and games and scheduled an extra special outing or two to keep us all entertained. We also had a list of over 200 things to do, most of them free, all of them cheap, that would keep everyone happy and entertained during the holidays. I even threw in a few household chores - after all, not everything has to be pure entertainment and chores can be fun. I've published the list before, but here it is again, just in time for the winter school holidays. School hols start here in Victoria tomorrow, so, if you are struggling to end the "there's nothing to do" whines, choose a few things off the list, and then have fun. • ride bikes • roller blade • basketball • play board games • make a tent out of blankets • squirt with hoses - but don t waste water • run through the sprinkler • have a skip-a-thon • start researching your family tree • start documenting your family tree • organise and plan a family reunion • hold a family reunion • read books - visit your local library and try some you haven t read before • blow bubbles • colour free templates you've downloaded and printed • play with play dough • press flowers • do crafts with pressed flowers - make a start on your Christmas cards • write a letter to a relative, friend or pen pal • clean bedroom (one of my favourites) • vacuum living room • clean bathroom • make a craft - try something new • draw • make homemade play dough • paint • pull weeds • give your favourite person a surprise party • watch a movie • write stories • use binoculars - look for as many different things as you can • use magnifying glass • use microscope • bird watching - how many different breeds can you find in your backyard? • write a play • act out a play • invent circus acts • perform a circus • play card games (snap, old maid, go fish) • make art on the footpath with chalk • play catch • play baseball • collect rocks • collect leaves • collect feathers • play Frisbee • make Frisbees out of old plastic lids, decorate with markers • dust the house • brush the pet • write letters to the editor of your local newspaper about articles you are interested in • read a magazine • play dress-up • play Cowboys • pick vegetables and then help Mum cook dinner • play outside with the pet • build a fort in your rooms • build a fort in the backyard • do a jigsaw puzzle • play on the computer • surprise Mum and Dad with breakfast in bed • listen to a story or book on tape • do extra schoolwork to get ahead • do brain teasers (i.e.: crosswords, word searches, hidden pictures, mazes, etc.) • cook • prepare lunch • surprise a neighbour with a good deed • play shops • prepare a "restaurant" lunch with menus • hold a tea party • have a Teddy bear picnic • play with toy cars • play dolls • play house • chase butterflies • collect caterpillars and bugs • plant a garden or a pot • collect seeds • hunt for four-leaf clovers • learn magic tricks • put on a magic show • plant a container garden • sprout seeds or beans • grow a grass head • make sock puppets • put on a puppet show • make Christmas presents • make homemade wrapping paper • make homemade gift cards • make picture frames from twigs glued onto sturdy cardboard • crochet or knit • make doll clothes • sew buttons in designs on old shirts • run relay races • make bookmarks • take a quiet rest time • take a shower or bubble bath • bath a pet • feed the birds • watch the clouds • organise a dresser drawer • clean under the bed • empty dishwasher • vacuum under the couch cushions and keep any change found • write these ideas on pieces of paper and pick out one or two to do • whittle • whittle bars of soap • practice musical instruments • perform a family concert • teach yourself to play a musical instrument (recorder, harmonica, guitar) • fold clean washing • sweep kitchen or bathroom floors • sweep front paths • sweep back verandah • sweep driveway • wash car - on the grass, of course! • vacuum car • vacuum or dust window blinds • clean bathroom mirrors • clean sliding glass doors • clean inside of car windows • wash bicycles • clean garage • play in the sandpit • build a sandcastle • work with clay • copy your favourite book illustration • design your own game • build with blocks or Lego • create a design box (copper wire, string, odds-and-ends of things destined for the garbage, pom-poms, thread, yarn, etc.) • plan a neighbourhood or family Olympics • have a marble tournament • find a model train club and see if they have visitors at their running days • take your bikes to the local BMX park and have a picnic and a day of riding • spend an hour or two at the local skateboard park learning some new tricks • paint a picture with lemon juice on white paper and hang it in a sunny window and see what happens in a few days • finger paint with instant pudding • make dessert • make dinner • have a sleepover • have a pamper party and paint your nails • make popcorn and watch an old movie • make toffee with Mum • make pink or blue (or whatever colour) pancakes for lunch • give your pet a party • start a nature diary • have a read-a-thon with a friend or sibling • have a neighbourhood bike wash • play Kick the Can • check out a science book and try some experiments • make up a story • catch butterflies and then let them go • arrange photo albums • find bugs and start a collection • do some stargazing • decorate bikes or scooters and have a neighbourhood parade • play hide-and-seek • create a symphony with bottles and pans and rubber bands • listen to the birds sing • try to imitate bird calls • read a story to a younger child • find out what's on at the Library and then go have free fun • find shapes in the clouds • string dry noodles or O-shaped cereals into a necklace • put together a family newsletter • write reviews of movies, plays, TV shows or concerts you see during the summer • bake a cake • bake a batch of biscuits • decorate a shoe box to hold your treasures • create family scrapbooks with old photos • glue noodles into a design on paper • play hopscotch • play jacks • make up a song • make a teepee out of blankets • write in your diary • find an ant colony and spill some food and watch what happens • play charades • make up a story by drawing pictures • draw a cartoon strip • make a map of your bedroom, house or neighbourhood • call a friend • cut pictures from old magazines and write a story • make a collage using pictures cut from old magazines • do a secret service for a neighbour • plan a treasure hunt • make a treasure map • make up a "Bored List" of things to do • plan a special activity for your family • search your house for items made in other countries and then learn about those countries from the encyclopaedia or online • plan an imaginary trip to the moon • plan an imaginary trip around the world, where would you want to go • write a science-fiction story • find a new pen pal • make up a play using old clothes as costumes • make up a game for practicing math facts • have a Spelling Bee • make up a game for practicing spelling • surprise an elderly neighbour or relative by weeding his/her garden • Finger paint with shaving cream • collect sticks and mud and build a bird's nest • write newspaper articles for a pretend newspaper • make a hideout or clubhouse • make paper airplanes • have paper airplane races • learn origami • make an obstacle course in your backyard 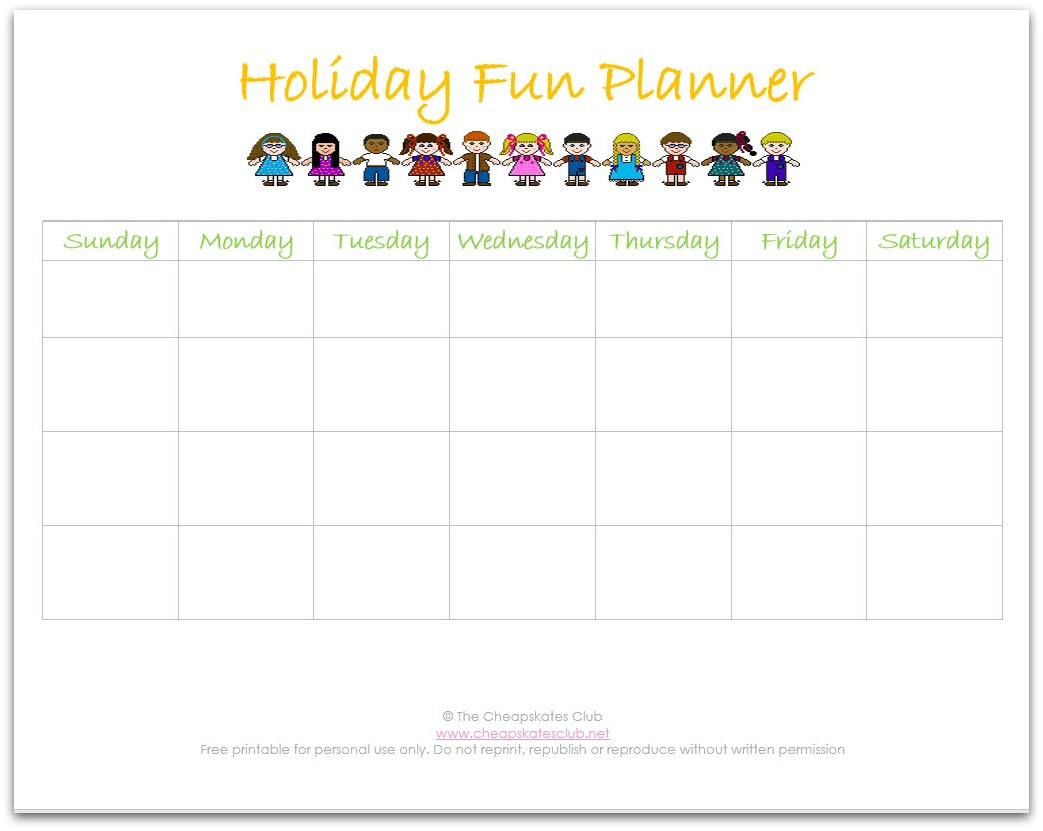 After you've made your choices, use the Holiday Fun Planner to schedule all that fun, so you don't forget what you've planned or over-schedule (holidays mean down-time too). Stick your Holiday Fun Planner on the fridge so everyone can see what's coming up and have something to look forward to.
 You can make really pretty and unique baubles for your Christmas tree with just sewing thread, paperclips and two or three different, recycled gaudy necklaces made of large beads. Just string one large bead with two, three or five large ones and use a paperclip to hang them on the Christmas tree. You'll find a wonderful assortment of necklaces at any op shop for just $1 or $2 each and you'll get a lot of ornaments from one necklace.
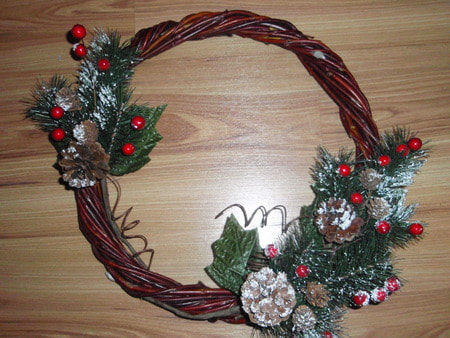 Willow wreaths are so easy to make and they look lovely, either as they are or decorated. I use small willow wreaths to decorate our Christmas tree. If you want to use them for the same thing, you need to make them now so they have time to dry.
To make a small willow wreath, approximately 5cm in diameter you need one long or two short willow strands. Step 1. Strip the leaves from the strands. Step 2. Take one strand and twist it into a small circle. Weave one end around the circle to secure. Step 3. Take the other end and weave it in and out of the circle until you reach the end. Step 4. Tuck the end into the weaving to secure. Step 5. Lay the wreaths on several thicknesses of newspaper and place them in a warm, dry spot (in front of a sunny window is ideal). Turn the wreaths every day or so. Leave them for a month until they have dried. To decorate use craft paints to spray them gold, silver or red. Use a hot glue gun to stick berries, flowers, bows or other embellishments. Cut a 10cm length of narrow ribbon. Fold in half and glue raw edges to the back of the wreath. Let the glue dry then hang by the ribbon. Where to find willow: Weeping willows grow all over the place. They were once very common but have fallen out of favour due to their creeping and invasive roots. You'll still find them in parks and along creeks and waterways, or even along the side of a country road. I make Wayne stop at the picnic area between Goulbourn and Yass every time we are coming home from Sydney so I can collect a few more willow strands (the willows are on the southbound side of the freeway, which is why we stop on the way home). If the willow is on private property ask permission before taking just the number of strands you need to make your wreath. 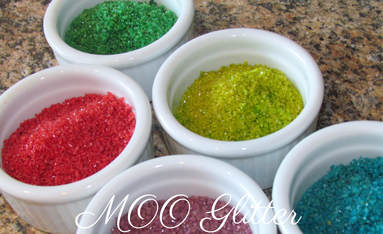 Glitter is fun to use. It adds sparkle and shine, and wonderful colour to lots of different craft projects. Kids love to use it on posters and cards and on dough crafts. Mums love to sprinkle it under the Christmas tree or on a bedside table as fairy glitter and watch little faces light up with wonder and delight when they see it.
The problem is glitter is expensive. And it gets absolutely everywhere. Well not this homemade glitter. It's so cheap it's ridiculous, is really easy to clean up, safe for kids to use and can be made whenever you need it because it only takes about 15 minutes to prepare. To MOO glitter you will need: Table salt or sea salt, depending on whether you want fine or chunky glitter Food colouring Small bowl Fork Biscuit tray Baking paper Air tight jar Turn the oven on to heat to 180 degrees Celsius. Put your salt in small dish and add 1 drop of food colour. Stir with a fork to mix the colour through. Add another drop if you want darker colour. Make sure you mix it really, really well so the colour is evenly spread through the salt. Line a biscuit tray with baking paper. Spread the salt on the tray. Bake for 10 minutes. Let the glitter cool on the tray. Store it in an airtight jar, and use it just as you would regular glitter. Shared from Debt Free, Cashed Up and Laughing 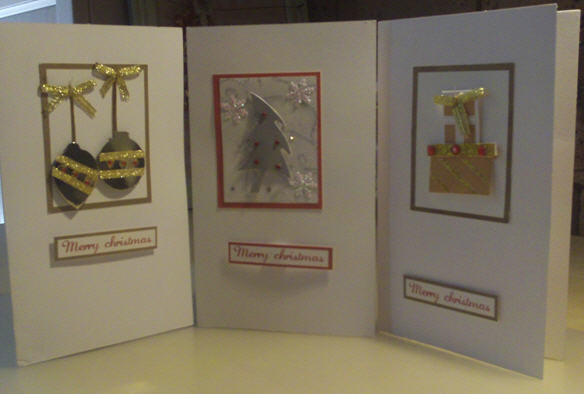 Around this time of year the Post Office becomes very busy - it's card sending season. Of course we send cards all year round, but from the beginning of November through to the end of December Christmas cards are in the mail. I love sending cards each year, but I like to send unique cards. I want the cards I send to be different to the run of the mill Christmas cards available in the shops. There are lots of things you can do to personalize and create unique Christmas cards and they don't have to break the budget. One easy way to do this is to make them. Now card making can be time consuming so to create beautiful, one-of-a kind cards I buy kits. These lovely cards were made using kits that cost just $2 per pack of 10 cards (and all the embellishments I could ever want) from a $2 shop. That's just 20 cents a card, as opposed to the $5 - $8 a card from the newsagent. If you don't feel that crafty, buy a packet of Christmas cards and embellish them. Use gold and silver gel pens to outline the main feature on the card. Have a card with a Santa on it? Add a little gold or silver pom pom to the end of his cap and glue a little cotton ball onto his beard. Add a tiny, red metallic pom pom to Rudolph's nose. Brush some clear glue over the stars and sprinkle them with glitter (do this over a sheet of paper so you can collect the glitter that doesn't stick and re-use it). Tackle a few cards each night and it won't be long before you have your Christmas card list finished and ready to post on the 30th November. Platinum members can login for full access to the Tip Store
Not a Platinum Cheapskates Club Member? Please upgrade to a Platinum Cheapskates Club membership to be able to access our Member's Centre. Click here to upgrade your Cheapskates Club membership today |
Archives
April 2020
Categories
All
|
 RSS Feed