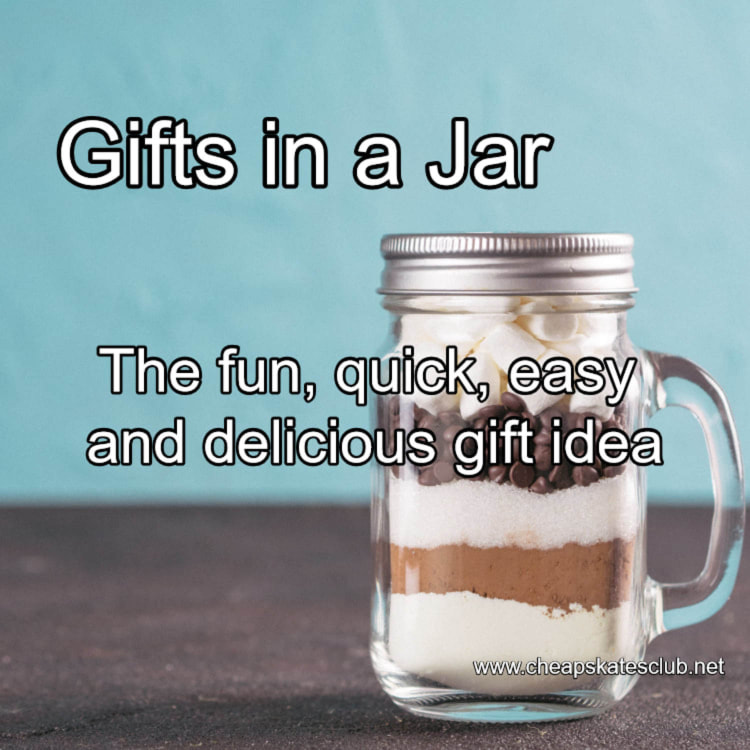
 Need a gift in a hurry? Go to your stash of jars then head to the pantry and start packing that jar with all the ingredients to make Simple Shortbread or Snickerdoodles and voila you have a gorgeous, very useful, very inexpensive gift in a jar!
FROM THE MEMBERS CENTRE: GIFTS IN A JAR Gifts in a jar can be as simple or as complex as you like. They can be in jars or boxes or buckets or any other container suitable for the contents of your gift. They can be for eating or gardening or sewing or relaxing in the tub. Gifts in a jar are only limited by your imagination. Here are two of my favourites: Simple Shortbread Mix Ingredients: 1 cup SR flour 1/2 cup ground rice 1/4 tsp salt 3/4 cup castor sugar Method: Combine ingredients and pack into a jar. Attach label with instructions as below. Simple Shortbread 1 jar Simple Shortbread mix 1 cup butter Heat oven to 150 degrees Celsius. Cut cold butter into flour with a knife. Using fingertips knead shortbread mix and butter until mixture resembles breadcrumbs. Use a knife to mix into a dough. Press mixture into a shortbread mould (if you have one) and cook on a baking sheet or press and cook in a greased, 20cm round cake tin. With a butter knife mark out wedges (you should get 12). Bake for approximately one hour, or until light golden on top. Do not brown. Cut into wedges while still warm. Snickerdoodle Mix 2 3/4 cups SR flour 1 1/2 cups sugar 1/4 tsp salt Method: Combine ingredients and pack into a jar. Attach label with instructions below. Snickerdoodles 1 jar Snickerdoodle mix 1 cup butter 2 eggs 2 tbsp sugar 2 tsp cinnamon Heat oven to 200 degrees Celsius. Cream butter with electric mixer until light and fluffy. Add eggs and beat until mixture is smooth and creamy. On low speed, add Snickerdoodle mix and beat until a dough forms. Roll dough into balls about the size of a 20 cent coin. Mix sugar and cinnamon in a small bowl. Roll balls of dough in the cinnamon sugar and then place on ungreased cookie sheets, about 5cm apart to allow room for spreading. Bake 8 - 10 minutes until light brown. Cool on wire racks.
0 Comments
 Ingredients:
500g chocolate cream biscuits 250g cream cheese peppermint essence 1 bag choc melts 2 tsp copha Choc sprinkles Method: Crush the biscuits to a fine crumb. I use my food processor to do this, so the crumbs are very fine. Using either the food processor or your hands, add the cream cheese and combine until the crumbs form a ball. Using a teaspoon, shape mixture into balls. Chill. Melt chocolate. Dip balls in chocolate then roll in sprinkles. Put on a plate to set. Store in the fridge in an air tight container. Can be frozen. 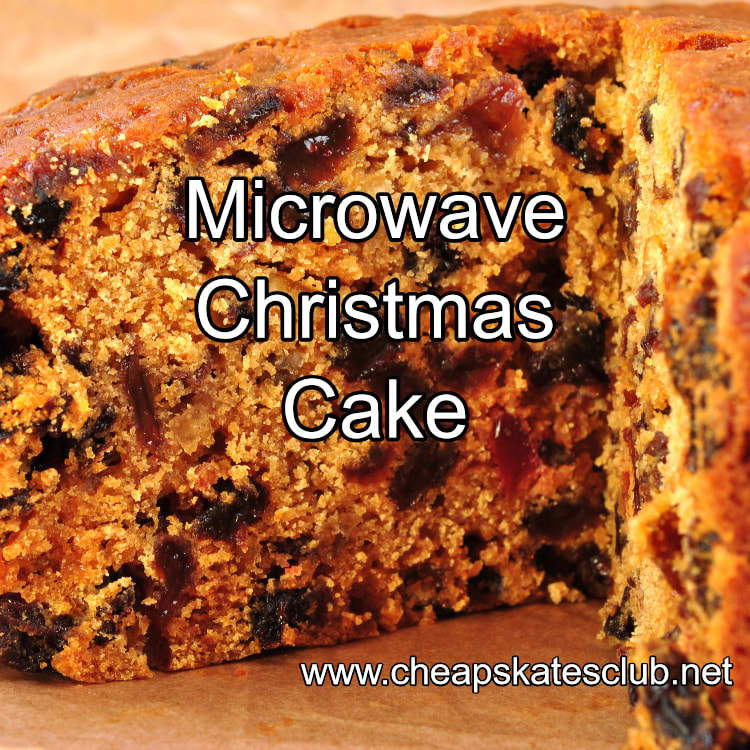 Not long after we were married, Wayne's Aunty and I went to a microwave cooking demonstration. It was mind-blowing to me. I'd always thought the microwave was for reheating; I'd never tried to cook in it.
One of the best things I learned at that demonstration was this recipe for a fruit cake - cooked entirely in the microwave oven, and in a quarter of the time it takes in a conventional oven! Ingredients: 1kg mixed fruit 200g butter 1cup brown sugar 2tbsp liquid (orange juice, brandy or water) 4 eggs 1 cup SR flour 1 tsp mixed spice 1 tsp Parisienne Essence - see note Method: Place the fruit, butter, brown sugar and orange juice in a microwave safe container and cook on high for five minutes. Let go completely cold. When cold, add the flour, mixed spice and Parisienne essence. Beat the eggs and add to the mixture. Stir well. Cook in a 20cm microwave safe round cake pan. Line base of pan with baking paper. Wrap outside with foil, extending 2cm above top of pan. Secure with a rubber band. Cook 25 minutes on medium. Let cool in pan. Note: As this cake is cooked in the microwave, it doesn’t brown like a traditional fruit cake. The Parisienne Essence darkens the cake, giving it a more traditional look.If you don't have it, leave it out - just remember your cake won't darken like a traditional fruit cake. Nuts’n’Bolts
Ingredients: 500g Nutrigrain (generic equivalent works just as well) 375g salted peanuts 375g pretzels (broken into small pieces) 100g pumpkin seeds 1 packet Cream of Chicken soup mix 1 packet French Onion soup mix (generic works just as well) 3 tsp curry powder Pinch chilli powder 1/2 cup currants (or sultanas) 3/4 cup olive oil, heated Method: Combine all ingredients except oil in a large bowl. Mix well to make sure everything is coated with the seasonings. Warm the oil and stir through the dry ingredients, making sure they are all coated completely. Store in a large, air tight bowl. If you are going to jar it up for gifts, wait two days. Stir the mix completely each day then on the third day pour into jars and label. This mix looks great in nut dishes on the Christmas table too. If you don't have all the ingredients, don't stress. Add what you have, and substitute the rest. This makes a HUGE batch, so great for a few gifts, with plenty leftover for your Christmas snacks. Package it in jars or cellophane bags to give.  It's the best day of the year for shopping. Whether you get to line up early on the 26th or you have to wait until the 27th, hitting the Boxing Day sales is great fun and a great opportunity to pick up some fantastic bargains....and get a head start on next Christmas!
Before shopping: *Check to see what you already have. *Make a list of the things you want to buy. Prepare your list around what you already have, what's on sale, and what gifts you'll need in the coming year (birthdays, Mother's Day, Father's Day, 21sts, engagements, weddings, special anniversaries, new babies and of course next Christmas!). *Plan your spending to avoid impulse buys. Don't spend money on things you don't need. *Wear comfortable shoes and clothes, take a bottle of water and remember to have fun. 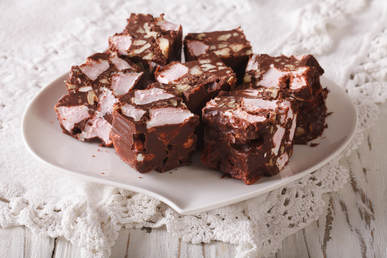 Easy Rocky Road
Ingredients: 1 x 250 gm packet snakes 2 x 200 gm blocks milk chocolate, melted 1 x 100gm packet mallow bakes (mini marshmallows) 1 cup roasted unsalted peanuts, toasted 1 cup desiccated coconut Method: Grease an 8 cm x 26 cm bar cake pan; line base and two long opposite sides with baking paper, extending paper 5 cm above edges of pan. Using scissors, snip snakes into 2-cm lengths. Combine snakes with remaining ingredients in a large bowl; mix well. Spoon mixture into prepared pan, pressing mixture firmly with back of spoon. Cover refrigerate several hours or until set. To serve, stand for 10 minutes at room temperature before cutting into slices. I have also put some mixture into patty pans and once set turned them out and placed them upside down on a plate put some ice cream on the top for children who would not eat plum pudding at Christmas time.  We call this Almost Instant Fudge because it's really quick to make and has just two ingredients - yes, just two ingredients.
To present this as a gift I like to repurpose a gift box or a pretty jar. Just recently I picked up Moccona jars for 50 cents each from the op shop, and they are perfect for packaging treats, including fudge and even Grandma's Shortbread Almost Instant Fudge Ingredients: 2 packets choc melts 1 tin condensed milk Method: Combine the choc melts and the condensed milk in a microwave safe bowl. Cook on HIGH in 30 second bursts, stirring between each burst, until the chocolate has melted and is completely mixed into the condensed milk. Pour into a well buttered 20cm square pan. Let set about 10 minutes, then carefully mark into squares. Place in the fridge to set completely. You can add chopped nuts or dried fruit to the fudge after cooking. You can also trim the cost by using MOO Condensed Milk. I buy choc melts on sale all year round and keep them in the freezer ready to use. This hamper comes complete with the ingredients for MOO Pancake Syrup, MOO Hotcakes and the tip sheets with full recipes in a neat gift hamper making it portable, the ideal gift for the family heading off on holidays.
Cheapskates Hotcakes Hamper You will need: Mum's Secret Hotcakes & Moo Pancake Syrup Tip Sheet Large paper lunch bags 2 x ziplock sandwich bags 1 x 250ml glass bottle with a leak-proof stopper (an old mint sauce bottle is good) 2 cups SR flour 1/4 cup milk powder (skim or full cream) 2 tsp sugar 2 cups brown sugar 1 tsp vanilla sugar Optional - cast iron pancake pan - from specialty stores, around $5 Instructions: Print the tip sheets. Mix the SR flour, powdered milk and sugar together and put into a ziplock bag and label "Hotcake Mix". Place the brown sugar and vanilla sugar into another ziplock bag and label "Pancake Syrup Mix". Decorate the front of one paper bag with "Hotcake Mix" and another with "Pancake Syrup". Decorate a third paper bag with the words "Cheapskates Hotcakes Hamper". Place the hotcake mix and the pancake mix into this bag along with the small glass bottle. Fold the tip sheet and slip into the paper bag. Fold the top of the bag over and staple shut. Attach a gift tag. This shortbread makes a wonderful gift, on its own in a pretty box or on a nice plate, or teamed with a special tea or coffee and a nice cup and saucer. It's also gender neutral - anyone can enjoy homemade shortbread.
Grandma's Shortbread - $3.55 Ingredients: 250g butter $2.50 1/2 cup castor sugar 25c 1-1/2 cups plain flour 30c 2/3 cup rice flour 50c Method: Pre-heat oven to 170 degrees Celsius. Beat butter and sugar until light and fluffy. Sift flours together. Using fingertips gradually work flours into butter mixture until combined. Knead on a floured surface until smooth. Roll out to about 2cm thick. Cut into circles or fingers. Put on buttered trays. Sprinkle with castor sugar if wanted. Prick top of biscuits with a fork. Bake until firm and light golden around edges, about 15 - 20 minutes. Cool on cake rack. Store in airtight container.  This is no ordinary run 'o the mill hamper - this is a Cheapskates Style Cleaning Hamper - the best gift ever for the practical people on your gift list.
It will come in at under $20. Cleaning Hamper - $16.10 You will need: 1 plastic bucket - 80c Laundry soap - $2.00 Washing soda - $4.00 Borax - $4.10 White vinegar $1.20 1 packet microfibre cleaning cloths $4.00 Cleaning Tips Grandma Used Cheapskates Washing Powder Print Tip Sheet. Pack all the items into the bucket, wrap with cellophane and tie in a bow with ribbon. You should find all the items at your local supermarket, but if you have time, you'll do better on prices for the microfibre cloths at $2 shops or even a hardware store. For the laundry soap, generic or store brand is fine. A box of four cakes is around $2.20, and you'll find it in the laundry aisle, usually towards the bottom of the shelves. Washing soda (or sodium carbonate) is from the laundry aisle. The common brand name is Lectric Soda, it's in a white packet with red writing on it. You may need to search for it, but it will be there. Borax is the mystery item on this list. Not all supermarkets keep it on the shelf, both my local Coles and Woolworths do, but you need to search for it. It's in the cleaning aisle, towards the pest control section. At Coles the brand is Bare Essentials, in a white tub with a pink lid. If you can't find it at the supermarket, don't despair. You'll get it at a hardware store, and definitely at Bunnings. For the microfibre cloths, if you have the time to zip into your favourite $2 shop, they'll be much cheaper than at the supermarket. If you're pressed for time, check the prices at the supermarket before you toss them in the trolley. Coles sell a pack of three - dusting, glass and kitchen - for $4, Simply Clean. And they're labelled so you know what their use is. |
Archives
April 2020
Categories
All
|
 RSS Feed