 Fresh Value Market in Cranbourne has strawberries for $1.99/500g this week - that's a great price and it means it's time to make jam.
Winter is the ideal time to make jam too - it's hot work. Standing over a pot of boiling fruit and sugar in winter isn't nearly as uncomfortable as it is in summer. Here are my tips for making great jam, every single time. 1. Use dry, barely ripe (preferably under-ripe) fruit. 2. Use a large, wide saucepan or stockpot, preferably aluminium or stainless steel. 3. Fruit should be partly cooked before adding the sugar. 4. Bring fruit to the boil slowly, to avoid burning and sticking. 5. Use a wooden spoon for stirring, although a slotted metal spoon is ideal for skimming. 6. Add warmed sugar, the helps the sugar to dissolve faster and prevents lowering the temperature and possible over-cooking of the fruit. 7. When sugar is added boil as rapidly as possible. Rapid boiling improves the colour and flavour of the jam and should continue for at least 10 minutes until setting point is reached. 8. Skim with a metal slotted spoon or stir in a lump of butter about the size of a walnut when the jam is cooked. If skimming, only skim once. 9. To test jam put a tiny amount on a saucer. When cooled it should form a skin on top. 10. Jam jars can be any jar that is clean, dry and unchipped. Jars should be sterilised and warmed in the oven to prevent cracking when the hot jam is poured in. 11. Seal immediately with jam covers (Kleer View Preserve Covers from hardware and supermarkets) or warm paraffin wax or wait until jam is completely cold. Never seal lukewarm jam. Strawberry Jam Ingredients: 1kg strawberries, hulled and halved 1kg white sugar Juice 1 lemon Method: Warm the sugar in the microwave on HIGH for 1 minute. Warm sugar dissolves much faster. Put fruit, sugar and lemon juice in a large pot. Bring to a boil, stirring constantly. Make sure all the sugar has dissolved. Use a wet pastry brush to brush down the sides of the saucepan. Once boiling, boil rapidly for 10—15 minutes. Test. Once the jam is ready turn off the heat. Bottle immediately in sterilised, warm jam jars.
0 Comments
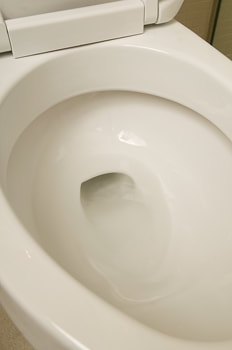 When it comes to keeping the bathroom not only smelling clean, but actually really clean drastic times call for drastic measures. Everyone has times when visiting the bathroom can fill you with dread. It may be you have littlies toilet training or illness in the house or a dozen other reasons. Bathrooms are a thriving bacteria factory.
Deodorize and kill all those unwanted germs with some MOO toilet bombs. You will need: 1/3 cup bicarbonate soda 1/2 cup citric acid 30 drops of lavender, peppermint and lemon essential oils Water A tray to use as a mould - a flexible ice cube tray is good for this Step 1. Mix the bicarb soda and citric acid together and add the oils (if the mixture is not damp add a little water to the mixture). Step 2. Press the mixture into a mould (an ice cube tray is ideal) and leave to set for around 6 – 8 hours until they are dry. Once set, they are ready to use. Drop one or two in the toilet last thing at night, let them fizz and bubble and work their wonder overnight. In the morning just flush for a sparkling toilet. 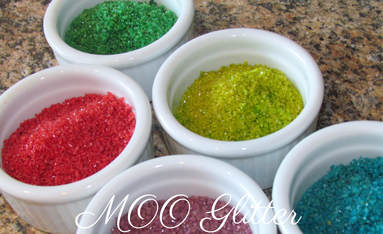 Glitter is fun to use. It adds sparkle and shine, and wonderful colour to lots of different craft projects. Kids love to use it on posters and cards and on dough crafts. Mums love to sprinkle it under the Christmas tree or on a bedside table as fairy glitter and watch little faces light up with wonder and delight when they see it.
The problem is glitter is expensive. And it gets absolutely everywhere. Well not this homemade glitter. It's so cheap it's ridiculous, is really easy to clean up, safe for kids to use and can be made whenever you need it because it only takes about 15 minutes to prepare. To MOO glitter you will need: Table salt or sea salt, depending on whether you want fine or chunky glitter Food colouring Small bowl Fork Biscuit tray Baking paper Air tight jar Turn the oven on to heat to 180 degrees Celsius. Put your salt in small dish and add 1 drop of food colour. Stir with a fork to mix the colour through. Add another drop if you want darker colour. Make sure you mix it really, really well so the colour is evenly spread through the salt. Line a biscuit tray with baking paper. Spread the salt on the tray. Bake for 10 minutes. Let the glitter cool on the tray. Store it in an airtight jar, and use it just as you would regular glitter. Shared from Debt Free, Cashed Up and Laughing 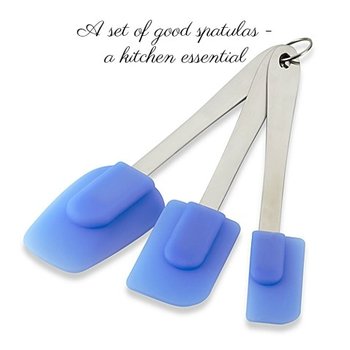 There are lots of kitchen tools and gadgets around, most of them pretty gimmicky or only good for one particular function. Things like tea bag squeezers may seem useful and cute in the shop, but get them home and you really do wonder why you bothered.
One set of kitchen tools I couldn't be without however are my spatulas. I have 5, all different sizes and shapes and made from different materials. There's the Tupperware pot spatula, just perfect for beating a batter due to the cut-out in the centre. I'm not sure if they're still available, this one is about 20 years old (Tupperware just keeps on going doesn't it?). Then there's the soft plastic spatula that fits the curve of my favourite mixing bowls. It does a great job of scraping every last drop of cake batter into the tin. But my very favourites are relatively new. I have three silicone spatulas, all different sizes and shapes. They were a spontaneous buy, I hadn't planned on them at all. I was in Big W with Mum, looking for cookies sheets and we were checking out the silicone bakeware. The smallest is just perfect for scraping out cream bottles and jam jars. The medium size cleans a mixing bowl perfectly. The largest is spoon-shaped and ideal for spooning pancake batter into a hot pan and cleaning out large mixing bowls. And they are three of my favourite kitchen money-savers. It's amazing just how much cream is left in the bottle after pouring it out. I use the smallest spatula to get every last drop of cream out of the bottle, sometimes as much as 1/4 cup - that's around 35c that would have gone into the bin if I didn't scrape. We use one bottle of cream a week, so over the course of a year that's $18.20 I am not throwing away. With that one use alone the spatula has paid for itself many times over! I scrape out all jars - pasta sauce, peanut butter, jam etc. And when I open a tin of baked beans or tomato soup it's always scraped out too. Australians waste billions of dollars worth of food each year, and a lot of it is the food left in jars, bottles and cans. A spatula can help reduce that waste! Vegemite jars are never recycled until they have been scraped and then swished with warm water (not hot, it will explode) and used to make gravy. Peanut butter jars are scraped out for sandwiches and then swished with a little warm water that I add to a curry, stir-fry or satay dish for extra flavouring. Scraping the mixing bowl can get two extra cupcakes from a batter, that's around 40c that's not going in the bin. I even use a spatula to scrape the pot when I've made mash - with two hungry boys - sorry young men - to feed there's never enough mash! These little scrapes are all small, quite insignificant on their own. But add them up and it's hundreds of dollars a year that isn't going into the bin or into the supermarket's profits. I'm always asked how I keep the grocery bill so low, this is one of the main ways. I make sure we use every last drop of everything and don't throw good food out - that really is just money in the bin. My spatulas make it easy to save money. Shared from Debt Free, Cashed Up and Laughing  I LOVE this muffin recipe, because like it's name, it is always ready! Make up a double batch and keep it in the fridge for up to four weeks (I can guarantee it won't last that long). It makes oven fresh, warm muffins so easy you can surprise the family with an extra special breakfast in the same time you can set the table, get out the bowls, cereal and milk and sit down. If you don't have raw sugar, white sugar is fine, or half white, half brown works too. I've even substituted honey for the molasses when I've been out (you can get molasses in the health food aisle of the supermarket and use it to MOO brown sugar as well, it won't go to waste). Use vegetable oil if you don't have coconut oil (olive oil makes moist muffins, but can leave a heavy taste so half olive oil, half vegetable oil is good). MOO buttermilk is easy, and cheaper than buying it unless you already have it on your shopping list. Simply take two cups of milk, less two teaspoons. Stir in two teaspoons of lemon juice or white vinegar, let it sit for five minutes and you have your MOOed version of buttermilk. Always Ready Muffins
Ingredients: 3 cups rolled oats (not Quick Oats) 1 cup hot water 3/4 cup raw sugar 1/4 cup molasses 1/2 cup coconut oil (or butter) 2-1/2 cups wholemeal flour (or gluten free flour blend with xanthan gum) 2 tsp bicarbonate soda 1 tsp salt 2 eggs 2 cups buttermilk 1 cup dried fruit Method: Mix oats and hot water. Let stand 5 minutes to soften oats. In a separate bowl, cream coconut oil (or butter), sugar, eggs and molasses. Add oat mixture, bicarb soda, salt, fruit and flour alternating with milk. Store, covered, in the fridge up to 4 weeks. To cook: Fill greased muffin tins or cupcake liners 2/3 full (I use an ice ream scoop.) Bake at 200 degrees Celsius for 20 minutes or until a toothpick inserted in the middle comes out clean. Makes about 3 dozen. The beauty of this recipe is that you cook as many as you need and chill remaining batter for next time.  Ingredients:
2 flour tortillas or Mountain Bread* 2 corn tortillas or Mountain Bread* 2 tomato & basil tortillas or Mountain Bread* 2 spinach tortillas or Mountain Bread* Nonstick cooking spray garlic salt onion powder chili powder Method: Preheat oven to 200 degrees Celsius. Put tortillas on a clean surface and spray with cooking spray, then sprinkle with seasonings to your taste. Flip over, spray and season the other side. Pile the tortillas up on a cutting board and cut into quarters using a sharp knife, forming 4 triangles. Put the cut tortillas on baking sheets, being sure not to overlap any. Bake in preheated oven until crisp, about 5 to 7 minutes. Remove from oven and slide off onto a cooling rack. They will get crisper as they cool. *Mountain Bread can be bought at your supermarket or online. You can order online from www.mountainbread.com.au There is a minimum order of 8 packets of Mountain Bread. If 8 packets sounds a lot Mountain Bread can be used for wraps, as lasagne sheets and in place of tortillas as well as making really nice chips. Bear in mind that it has a shelf life of 60 days, and can be frozen for up to 12 months. You can also share an order with a friend, delivery is free. From the October 2011 Journal  MOO Caramel Popcorn MOO Caramel Popcorn It's school holiday time again, and I can guarantee there are hoards of hungry kids out there, peering into pantries and staring into fridges, looking for something to eat.
You can buy snacks from the supermarket, when they are on sale - half price is the most you should pay, ever, or from grocery clearance stores like NQR here in Melbourne, but you are paying for a lot of nothing: packaging, artificial colours, artificial flavours, salt, sugar, fat - all things we don't need or really want to be paying for. Or you can be a very clever Cheapskate and whip up some great snack treats that cost a fraction of the price and rest easy knowing you're being kind to your budget and your kids. Over the next few days I'll post a few different snack foods, all favourites of ours. You can be sure my kids gave them a good taste test when they were younger, and you can be sure that we still enjoy them. Some of them are so simple the kids will be able to make them - a double win for you. They'll be doing the (not so) hard work instead of you and they'll be entertained for a while too! Today's snack idea is one of my absolute favourites - caramel corn (you'll need to to at least supervise this recipe, it does require a little cooking). Caramel Popcorn Ingredients: 20 cups pop corn 2 cups light brown sugar 1 cup butter or margarine 1/2 cup condensed milk 1 tsp bicarb soda 1 tsp vanilla extract Method: Spread the popcorn in a thin layer in shallow, greased baking pans. Preheat oven to 120 degrees Celsius. Combine the brown sugar, condensed milk and butter in a medium saucepan. Stir to combine. Bring to a boil over a medium heat. Boil for five minutes, stirring continuously. Remove from the heat and stir in the bicarb soda and vanilla essence, beating well. The mixture should be light and foamy. Immediately pour over the popcorn. Stir with a fork to mix. Don't worry too much if not the popcorn isn't completely covered with the caramel. Place into preheated oven and bake for one hour, stirring completely every fifteen minutes. Remove from oven and empty onto sheets of baking paper. Break the caramel corn into bite size pieces. Allow to cool completely before storing in an airtight container. Variation: Bliss Bombs - add 2 cups unsalted peanuts to the popcorn before covering with the caramel mixture. From Debt Free, Cashed Up and Laughing - the Cheapskates way to living the good life |
Archives
April 2020
Categories
All
|
 RSS Feed