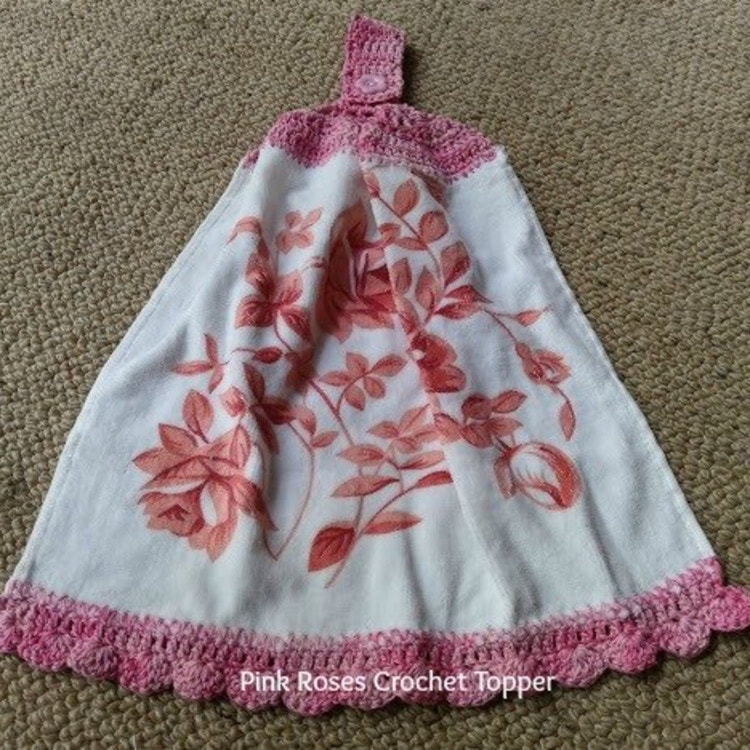
 This is a very quick and easy topper to add to a hand towel. I love to give them as gifts, sometimes with a bar of homemade soap, sometimes with a knitted dishcloth.
You will need: 1 tea towel, cut in half (you get two hand towels from the one tea towel) Crochet cotton to match 3mm crochet hook Hem the raw edge of the tea towel. Work a row of chain along the top edge of the tea towel. This is your foundation row. Row 1: Ch. 3, skip one chain, work 1 tr.t in each chain to end of row. Turn. Row 2. Ch. 3, skip one tr, work 1 tr. in every second tr. to end of row. Turn. Row 3. Ch. 3, skip one tr, work 1 tr. in every second tr to end of row. Turn. Continue in this manner until 5 treble remain. Turn. This forms the "handle" of your towel topper. Work 1 tr. In each chain to end. Turn. Continue in this manner until handle measures 10cm. Next row: Work 1 tr. In first four chain, ch. 2, skip 2 tr., work 4 tr. In next four chain. This forms the buttonhole. Next row: Work 1 tr. In each ch. to end. 10 tr. Turn. Repeat this row twice. Cast off. Sew button in place. Your towel is finished. Notes: The towel in the photo cost $1.50 to make. I buy handtowels and pretty tea towels from $2 Shops, on sale at Kmart or Big W and sometimes from the op shop if they are in very good condition (i.e. new). Supermarkets often have lovely tea towels, but wait until they come on sale for $2.50 each or less. From Debt Free,Cashed Up and Laughing
0 Comments
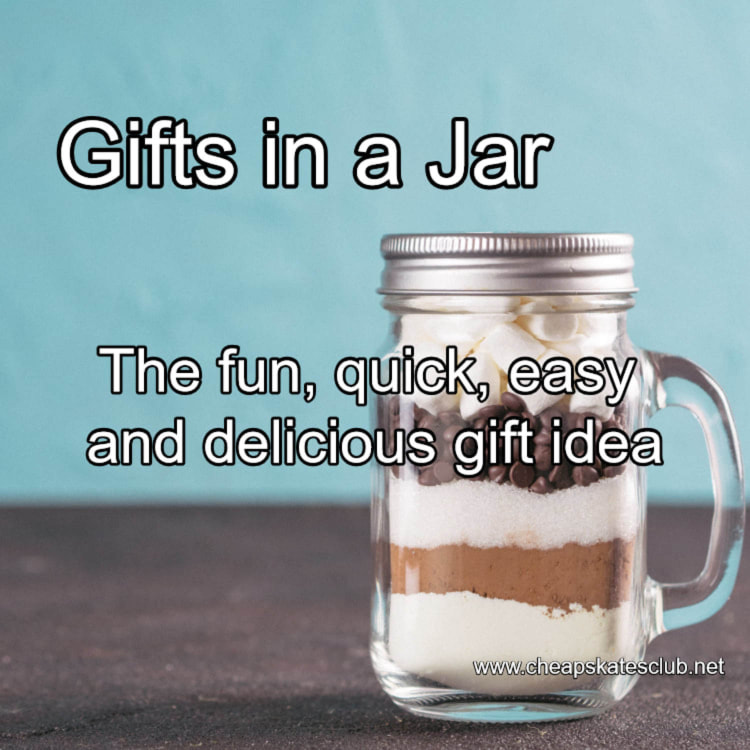 Need a gift in a hurry? Go to your stash of jars then head to the pantry and start packing that jar with all the ingredients to make Simple Shortbread or Snickerdoodles and voila you have a gorgeous, very useful, very inexpensive gift in a jar!
FROM THE MEMBERS CENTRE: GIFTS IN A JAR Gifts in a jar can be as simple or as complex as you like. They can be in jars or boxes or buckets or any other container suitable for the contents of your gift. They can be for eating or gardening or sewing or relaxing in the tub. Gifts in a jar are only limited by your imagination. Here are two of my favourites: Simple Shortbread Mix Ingredients: 1 cup SR flour 1/2 cup ground rice 1/4 tsp salt 3/4 cup castor sugar Method: Combine ingredients and pack into a jar. Attach label with instructions as below. Simple Shortbread 1 jar Simple Shortbread mix 1 cup butter Heat oven to 150 degrees Celsius. Cut cold butter into flour with a knife. Using fingertips knead shortbread mix and butter until mixture resembles breadcrumbs. Use a knife to mix into a dough. Press mixture into a shortbread mould (if you have one) and cook on a baking sheet or press and cook in a greased, 20cm round cake tin. With a butter knife mark out wedges (you should get 12). Bake for approximately one hour, or until light golden on top. Do not brown. Cut into wedges while still warm. Snickerdoodle Mix 2 3/4 cups SR flour 1 1/2 cups sugar 1/4 tsp salt Method: Combine ingredients and pack into a jar. Attach label with instructions below. Snickerdoodles 1 jar Snickerdoodle mix 1 cup butter 2 eggs 2 tbsp sugar 2 tsp cinnamon Heat oven to 200 degrees Celsius. Cream butter with electric mixer until light and fluffy. Add eggs and beat until mixture is smooth and creamy. On low speed, add Snickerdoodle mix and beat until a dough forms. Roll dough into balls about the size of a 20 cent coin. Mix sugar and cinnamon in a small bowl. Roll balls of dough in the cinnamon sugar and then place on ungreased cookie sheets, about 5cm apart to allow room for spreading. Bake 8 - 10 minutes until light brown. Cool on wire racks.  Cranberry Orange Nut Bread
Ingredients: 2 cups plain flour 1 cup sugar 1 1/2 tsp baking powder 1/2 tsp salt 1/2 tsp bicarbonate soda 1 tsp orange zest 3/4 cup orange juice, freshly squeezed 2 tbsp melted butter 1 egg, beaten 2 cups craisins* chopped roughly 1 cup chopped walnuts Method: Preheat oven to 170 degrees Celsius. Grease and flour a 9x5x3 loaf pan. Sift the flour, sugar, baking powder, salt and bicarb soda into a large bowl. In a separate bowl, whisk together the orange zest, orange juice, melted butter, and beaten egg. Slowly add the wet ingredients into the large bowl with the dry ingredients, stirring until just combined - do not over stir. Add the craisins and the walnuts and fold in until combined. Pour into prepared loaf pan. Bake in preheated oven for 55 minutes to 60 minutes. Remove from oven and let stand in loaf pan for 5 minutes, then turn out onto a cooling rack and let rest for several hours before serving. Makes 1 loaf. *Craisins are dried cranberries and are available in the dried fruit aisle of your supermarket.  You don't need to have a hot air corn popper to make fresh popcorn at home. You don't even need a microwave. You can easily pop popcorn the old fashioned way - in a pot with a lid on the stove! Popcorn popped on the stove has a smokier, much richer flavour and much less un-popped kernels than corn popped in a hot air popper or the microwave.
To pop popcorn on the stove: 1.Pour approximately two tablespoons of vegetable oil into the bottom of a large saucepan with a tight fitting lid. 2.Add enough popcorn to cover the bottom of the saucepan in a single layer. 3.Put the lid on and cook over a medium heat until you hear the first "pop". 4.Using the saucepan handle, carefully and gently shake the entire saucepan over the heat until the popping stops. Keep the saucepan moving or the corn will burn. 5.Remove from heat, take the lid off and tip the popcorn into a serving dish. Season if you wish to. To pop popcorn in the microwave: 1.Using a brown paper lunch bag, cover the bottom of the bag with popcorn. Make sure that the entire bottom of the bag is covered. 2. Fold over the top of the bag and staple it closed. Yes, the staple is metal, but it won't spark. 4. Place the bag in the microwave, lying down. 5. Cook on high until the popping stops. This will vary depending on how powerful your microwave is. I suggest that you start at two minutes and check. It may need another 30 seconds or so to complete the popping process. Popcorn Tips: Store your popcorn in the freezer. This helps all the kernels to pop. Buy your popcorn loose from your local wholefoods or health food store, rather than in packets from the supermarket. You can buy as much or as little as you need. Remember, 200g un-popped popcorn makes an awful lot of popped corn, a little goes a very long way. You can re-use the paper bag for microwave popcorn if you are very careful opening it. To add butter to freshly popped corn, melt the butter and pour it over the hot popcorn. Stir quickly to cover all the kernels. Caramel Popcorn Ingredients: 20 cups pop corn 2 cups light brown sugar 1 cup butter or margarine 1/2 cup condensed milk 1 tsp bicarb soda 1 tsp vanilla extract Method: Spread the popcorn in a thin layer in shallow, greased baking pans. Preheat oven to 120 degrees Celsius. Combine the brown sugar, condensed milk and butter in a medium saucepan. Stir to combine. Bring to a boil over a medium heat. Boil for five minutes, stirring continuously. Remove from the heat and stir in the bicarb soda and vanilla essence, beating well. The mixture should be light and foamy. Immediately pour over the popcorn. Stir with a fork to mix. Don't worry too much if not the popcorn isn't completely covered with the caramel. Place into preheated oven and bake for one hour, stirring completely every fifteen minutes. Remove from oven and empty onto sheets of baking paper. Break the caramel corn into bite size pieces. Allow to cool completely before storing in an airtight container. Variation: Bliss Bombs - add 2 cups unsalted peanuts to the popcorn before covering with the caramel mixture.  Ingredients:
500g strawberries, washed, hulled, chopped 1 cup white sugar 1 large lemon, juiced Method: Place strawberries into a 3-litre capacity heatproof microwave-safe bowl (such as Pyrex). Add sugar and 1/4 cup lemon juice. Microwave, uncovered, for 4 minutes on High/100%. Stir to dissolve the sugar. Microwave for a further 15 minutes on High/100%, (jam should still be a little runny) or until jam reaches setting point. (see note). Spoon hot jam into hot sterilised jars. Seal. Turn jars upside down for 2 minutes. Turn upright and allow to cool. Once opened, store in the fridge for up to 2 months. Note: To test jam: before starting the cooking process place two saucers in the freezer. After 15 minutes, take one sauce from the freezer and pour a teaspoon of jam onto the saucer. If the jam sets and stays when the saucer is turned upside down then it is set. If not cook in 5 minutes bursts, checking each time, until setting point is reached. 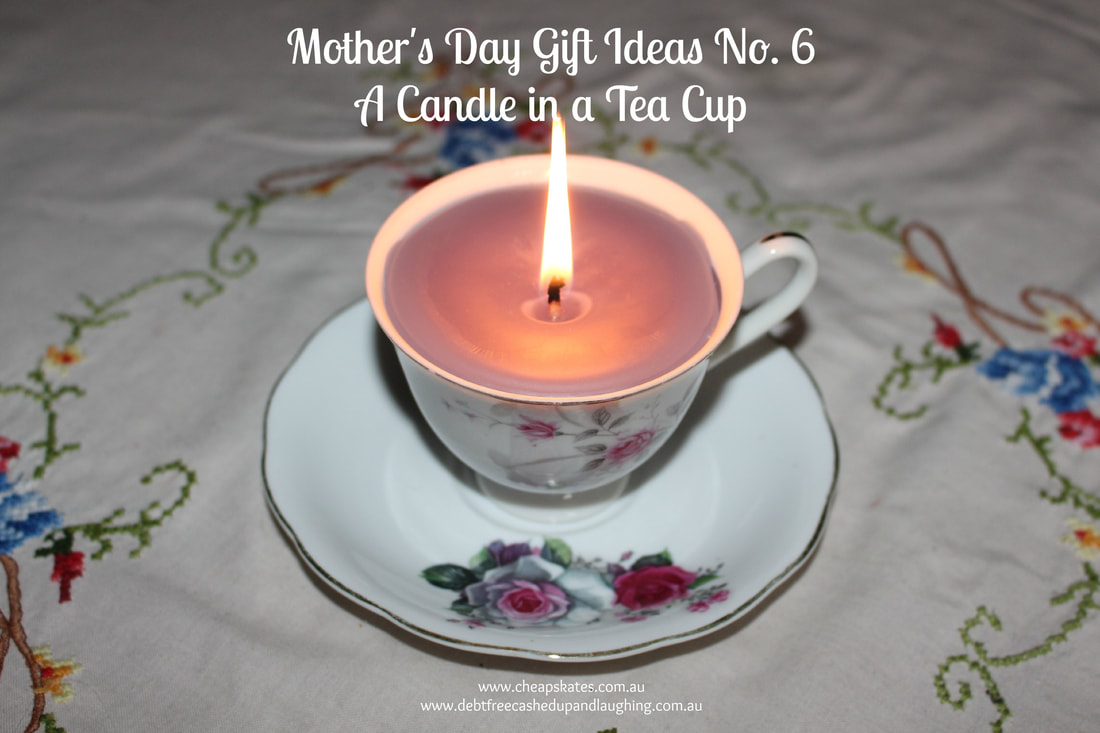 Pretty cups and saucers can be used for more than just afternoon tea. This candle in a tea cup is gorgeous, and cost almost nothing to make. I used a 50 cent cup and saucer from my favourite Op Shop, a candle we already had that was a little out of shape, a length of cotton string from the kitchen drawer and a few drops of lavender essential oil to scent it. They are quick to make too, about 15 minutes all up. This candle cost me 50 cents. I saw a similar thing at Coles yesterday, in their Mother's Day display, for $11! A Candle in a Tea CupYou will need: 1 tea cup and saucer 2 or 3 coloured candles Cotton string (or a candlewick if you have one) Your favourite essential oil Hot glue gun An old fruit tin or similar for melting the candles A large saucepan Step 1. Using your hot glue gun, glue the cup to the saucer. Step 2. Break your candles into smallish pieces. Put them in the fruit tin. Fruit tins are ideal for this step as you can throw them away when you are finished. If you do use a saucepan, don't use one of your favourites or you'll be cleaning it for ages. Wax is very difficult to remove completely. Use a fruit tin and avoid the stress (and the work). Step 3. Sit the fruit tin in a large saucepan. Fill it with water to about half way up the side of the fruit tin. Bring the pot of water to the boil, all the while stirring the melting candles. Once the water is boiling, turn it down to a simmer. Continue to stir the candles as they melt. Step 4. Cut a length of string twice the height of your cup. Dip the string into the melted wax a couple of times to stiffen it. Step 5. Carefully pour a tiny blob of melted wax into the bottom of the tea cup. Stick one end of the wick to the bottom of the cup. Step 6. Holding the wick straight (you might need someone to help you here) fill the cup to the brim with the melted wax. As the wax cools it will form a slight dip in the centre. Melt any remaining wax and fill the dip. Add embellishments to the rim of the cup, the handle and/or the saucer if you wish to. Platinum members can login for full access to the Tip Store
Not a Platinum Cheapskates Club Member? Please upgrade to a Platinum Cheapskates Club membership to be able to access our Member's Centre. Click here to upgrade your Cheapskates Club membership today Nuts’n’Bolts
Ingredients: 500g Nutrigrain (generic equivalent works just as well) 375g salted peanuts 375g pretzels (broken into small pieces) 100g pumpkin seeds 1 packet Cream of Chicken soup mix 1 packet French Onion soup mix (generic works just as well) 3 tsp curry powder Pinch chilli powder 1/2 cup currants (or sultanas) 3/4 cup olive oil, heated Method: Combine all ingredients except oil in a large bowl. Mix well to make sure everything is coated with the seasonings. Warm the oil and stir through the dry ingredients, making sure they are all coated completely. Store in a large, air tight bowl. If you are going to jar it up for gifts, wait two days. Stir the mix completely each day then on the third day pour into jars and label. This mix looks great in nut dishes on the Christmas table too. If you don't have all the ingredients, don't stress. Add what you have, and substitute the rest. This makes a HUGE batch, so great for a few gifts, with plenty leftover for your Christmas snacks. Package it in jars or cellophane bags to give. 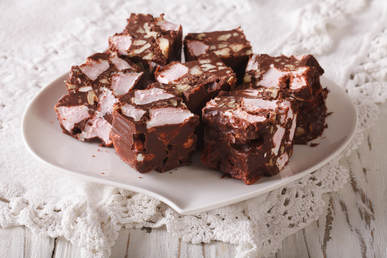 Easy Rocky Road
Ingredients: 1 x 250 gm packet snakes 2 x 200 gm blocks milk chocolate, melted 1 x 100gm packet mallow bakes (mini marshmallows) 1 cup roasted unsalted peanuts, toasted 1 cup desiccated coconut Method: Grease an 8 cm x 26 cm bar cake pan; line base and two long opposite sides with baking paper, extending paper 5 cm above edges of pan. Using scissors, snip snakes into 2-cm lengths. Combine snakes with remaining ingredients in a large bowl; mix well. Spoon mixture into prepared pan, pressing mixture firmly with back of spoon. Cover refrigerate several hours or until set. To serve, stand for 10 minutes at room temperature before cutting into slices. I have also put some mixture into patty pans and once set turned them out and placed them upside down on a plate put some ice cream on the top for children who would not eat plum pudding at Christmas time.  We call this Almost Instant Fudge because it's really quick to make and has just two ingredients - yes, just two ingredients.
To present this as a gift I like to repurpose a gift box or a pretty jar. Just recently I picked up Moccona jars for 50 cents each from the op shop, and they are perfect for packaging treats, including fudge and even Grandma's Shortbread Almost Instant Fudge Ingredients: 2 packets choc melts 1 tin condensed milk Method: Combine the choc melts and the condensed milk in a microwave safe bowl. Cook on HIGH in 30 second bursts, stirring between each burst, until the chocolate has melted and is completely mixed into the condensed milk. Pour into a well buttered 20cm square pan. Let set about 10 minutes, then carefully mark into squares. Place in the fridge to set completely. You can add chopped nuts or dried fruit to the fudge after cooking. You can also trim the cost by using MOO Condensed Milk. I buy choc melts on sale all year round and keep them in the freezer ready to use. This hamper comes complete with the ingredients for MOO Pancake Syrup, MOO Hotcakes and the tip sheets with full recipes in a neat gift hamper making it portable, the ideal gift for the family heading off on holidays.
Cheapskates Hotcakes Hamper You will need: Mum's Secret Hotcakes & Moo Pancake Syrup Tip Sheet Large paper lunch bags 2 x ziplock sandwich bags 1 x 250ml glass bottle with a leak-proof stopper (an old mint sauce bottle is good) 2 cups SR flour 1/4 cup milk powder (skim or full cream) 2 tsp sugar 2 cups brown sugar 1 tsp vanilla sugar Optional - cast iron pancake pan - from specialty stores, around $5 Instructions: Print the tip sheets. Mix the SR flour, powdered milk and sugar together and put into a ziplock bag and label "Hotcake Mix". Place the brown sugar and vanilla sugar into another ziplock bag and label "Pancake Syrup Mix". Decorate the front of one paper bag with "Hotcake Mix" and another with "Pancake Syrup". Decorate a third paper bag with the words "Cheapskates Hotcakes Hamper". Place the hotcake mix and the pancake mix into this bag along with the small glass bottle. Fold the tip sheet and slip into the paper bag. Fold the top of the bag over and staple shut. Attach a gift tag. |
Archives
April 2020
Categories
All
|
 RSS Feed