 Pancakes take a while to make so I usually put them on the meal plan for weekend breakfasts or lunches. If you’re tired of plain pancakes, why not try Apple Pancakes as an alternative instead? This recipe is easy to make. Use your imagination when serving. Try adding fresh blueberries or raspberries or thinly sliced apple and sprinkle with cinnamon sugar. Yum!
Ingredients 2 large eggs 2 cups SR flour, sifted 1/3 cup sugar for the recipe plus 2 tablespoons sugar (or more) for cooking 1 tsp bicarb soda 2 tsp ground cinnamon 1 tsp ground ginger 1/4 tsp grated nutmeg 2 cups plus 2 tablespoons buttermilk 60g unsalted butter, melted 2 tsp vanilla extract 2 peeled Granny Smith apples, 1 cored and grated, 1 thinly sliced on a mandolin Method: Begin by preparing your apples. (Remember to sprinkle a little lemon juice on the apples to keep them from turning brown after cutting or grating.) Cut one apple on a mandolin to make uniform thickness slices. These will be used with the pancake batter. The other apple should be peeled and grated to add to the batter. Now you’re ready to start on the batter itself. Melt the butter over medium heat being sure not to scorch it. In a medium to large size bowl, beat two large eggs until frothy. Add the flour to the beaten egg. Then add the 1/3 cup of sugar. Reserve the rest of the sugar for coating the apple slices before cooking. Next add the bicarb soda, salt, cinnamon, ginger and nutmeg. Add the buttermilk, vanilla and melted butter to the mixture and then stir to incorporate everything. Add the grated apple. Stir until just combined. The mixture will be thick. Preheat the frying pan over medium-high heat. Lightly spray with cooking spray or add a little butter. Add 1/2 cup batter to the pan. Place two lightly sugared apple slices on top. Cook the pancake until bubbles form (about 2 minutes). Flip the pancake with a spatula and cook until golden brown on each side for a total of about 4 minutes cooking time per pancake. You may need to spray the spatula with cooking spray between pancakes to ensure the pancake doesn’t stick to the spatula. Place the cooked pancake on a plate. Garnish with apples slices other fruit and a sprig of mint, if desired.
0 Comments
Save money by limiting the expensive or extravagant items you buy. For example, if you love an exotic, organic cake mix but it’s expensive, buy one every other month. Consider it a special treat when you have it, rather than something you must have every week or two.
Or better still, MOO cake mixes, store them in ziplock bags and you can make a cake whenever you feel like it. MOO Vanilla Cake Mix Ingredients: 4 cups plain flour 4 cups SR flour 6 cups white sugar 1/4 cup baking powder 2 tsp salt 2-1/4 cups unsalted butter* Method: Combine all the dry ingredients and then cut in the shortening with a pastry knife until it is very fine. Place in a 4 litre airtight container. Store for up to 3 months in the fridge. Bring the cake mix to room temperature to use it. *Note: Use real butter, do not be tempted to use margarine. To make a cake: Ingredients: 4-1/2 cups cake mix 3 eggs 1 tsp vanilla extract 1/3 c vegetable oil 2/3 c milk Method: Pre-heat oven to 175 degrees Celsius. Grease and flour a 33cm x 23cm cake tin. In a large bowl mix eggs, vanilla and oil. Add the cake mix, stir to combine. Then stir in the milk. Bake for 30-35 minutes or until a toothpick comes out clean when inserted in the middle. 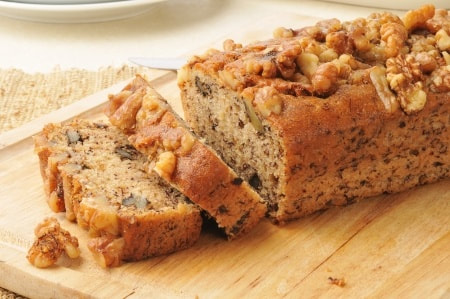 MOO Bisquick Banana Bread - the nicest and easiest banana bread ever! I love the convenience of mixes ready to go. At the moment I have chocolate cupcakes, tea cake, sultana muffins, cranberry muffins, cream of chicken soup, taco seasoning, spaghetti seasoning, pizza dough, doughnuts, instant custard, white sauce mixes all in jars (I love them too) or ziplock bags. I print the ingredients and method either onto a label or straight onto the jar or bag with a Sharpie so anyone can take a mix and make it. Means Wayne or the children can help me with baking or meal prep without my supervision or even input. Annabel, over at The Bluebirds are Nesting (Blue Wren in the forum) is doing a series on pantry preparedness. She posts a new topic each week and this week it was mixes. I love mixes. They are a vital component of my pantry, my stockpile and go a long way towards helping to keep our grocery bill to $320 a month. I can't remember the last time I bought a cake mix. Hannah bought a couple last year and made them, red velvet cupcakes if I remember correctly. We HATED them - they tasted so fake, had a horrible after-taste and left a greasy, thick feeling in our mouths. And they were expensive. During MOO Month I shared my go-to chocolate cake mix recipe.  A few years ago I put together a small ebook of mixes, called Make Our Own….Mixes. It's one of the more popular downloads in the member's centre, having been downloaded almost 32,000 times since it was first published! That's a lot of people MOOing mixes, or with the knowledge to MOO them. Annabel was asking for a Bisquick recipe. Bisquick isn't a common ingredient in Australian recipes, but as the Internet makes it so easy for us to find and try recipes from other countries, and as it is a popular product in the USA and Canada, knowing how to MOO it means we can try these recipes, save money on the packets and keep the nasty ingredients out. This is my Bisquick recipe. I use it to make biscuits, scones (if we are camping, otherwise I make Lemonade Scones), crumble topping, shortcakes, pancakes, pastry, as the base in impossible pies and quiches - it's very versatile. MOO Bisquick Mix Ingredients: 6 cups plain flour, sifted 3 tablespoons baking powder 1 tablespoon salt 1/2 cup cold, unsalted butter Step 1. Measure the sifted flour, baking powder and salt into a large bowl. Use a wire whisk to blend thoroughly. Step 2. Cut in cold butter using a pastry cutter until thoroughly incorporated. Store refrigerated in an airtight container for up to 4 months. This makes 6 cups of mixture. I pack it in 2 cup portions in ziplock bags in the freezer because I don't have room in the fridge. I keep most of my mixes in the freezer. Why? Well firstly because I don't have the shelf space for them. Secondly, some of them contain butter or oil and need to at least be refrigerated. They can be used straight from the freezer, if there are any clumps just break them up before you add the wet ingredients. Here are two of the ways I use it.  MOO Bisquick scones, hot and ready to enjoy MOO Bisquick Scones
Ingredients: 2 cups MOO Bisquick mix 2/3 cup milk. Method: Mix to a dough. Gently press out to about 2cm thick. Use a glass or scone cutter dipped in flour to cut into rounds. Place on a baking paper lined scone tray. Bake at 210 degrees Celsius for 12 - 15 minutes or until risen and golden. MOO Bisquick Banana Nut Bread This delicious banana bread uses MOO Bisquick as a shortcut. With the addition of cream cheese and walnuts you have one of the easiest and nicest banana breads you've ever tasted. Ingredients: 2 cups MOO Bisquick mix 1 cup sugar 250g cream cheese, softened 3 medium bananas, mashed 2 eggs 1/2 cup chopped walnuts Method: Pre-heat oven to 175 degrees Celsius. Grease and line the base of a loaf pan. Beat sugar and cream cheese together until smooth (it's easier if you use the mixer for this step). Add in the mashed bananas and eggs, and beat until well combined. Gently stir in Bisquick and walnuts, until just moist. Spread evenly into the loaf pan and bake for one hour. Cool completely before serving. This is a very moist banana bread, it doesn't rise to a high loaf, and it's just great for using up brown or black bananas. It also makes a great Gift in a Jar - just pack the dry ingredients in layers in a jar, add a label with the ingredients needed and the method. Add a pretty jar topper and a ribbon and it's ready to go. Mixes are great. MOO mixes are even greater. If you haven't tried to save money, time and energy with MOO mixes, give them a go. I'm sure you'll love the convenience and the cost. 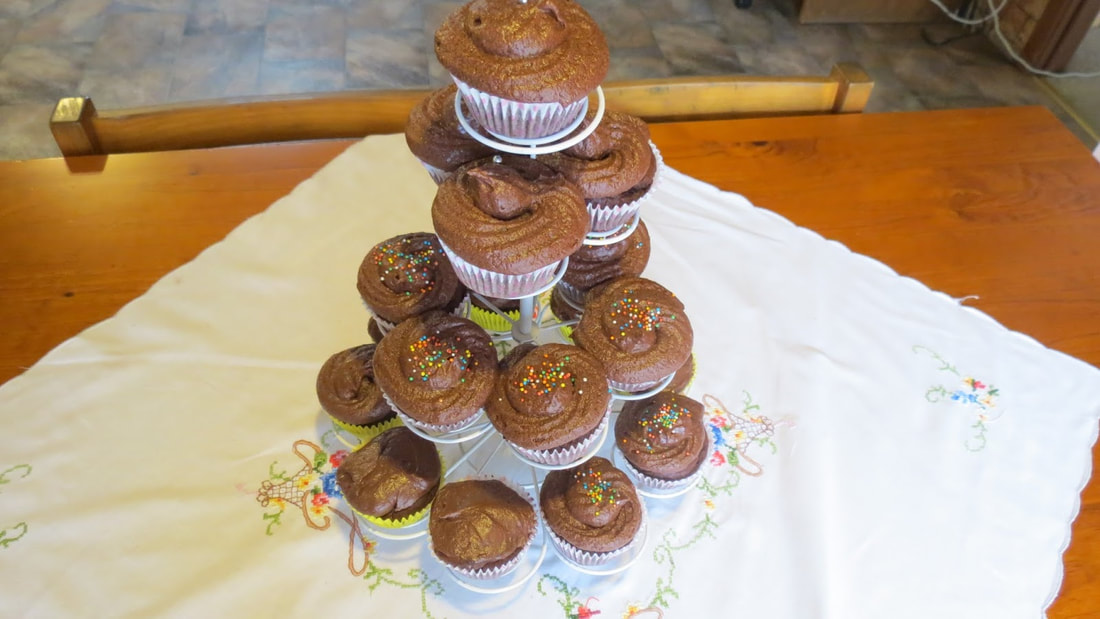 Boxed (or packet) cake mixes are convenient - to a point. You still need to add the wet ingredients, usually egg, water or milk, butter or oil, so what you're paying up to $9 for is basically flour, sugar, a rising agent, flavouring of some kind and then a whole lot of things you can't pronounce and really shouldn't be eating. That cake mix convenience ends up costing you up to $11! If you make a cake from scratch you'll use flour, sugar, butter or oil, milk or water, an egg or two, flavouring of some kind and if you didn't use self-raising flour, a rising agent (baking powder or bicarb soda, depending on the recipe). And your cake will cost you under $2! Now cake mixes are supposed to be convenient time savers because you just dump the contents into the mixer, add the wet stuff and beat for 3 minutes. If your recipe is a one-bowl mix, like the I've shared below, you do the same thing - dump all the ingredients into the mixer and beat for 3 minutes. It may take you a minute to measure out the flour, sugar and flavourings so a from scratch cake will take you 1 or 2 minutes longer to get to the baking stage. At a saving of up to $9 a minute or two is nothing. And they will both take about the same time to cook too, so no saving there. If you really love cake mixes, and I confess I do, you can quite easily make your own. When I'm baking a cake I get out a half a dozen ziplock bags and measure out the dry ingredients for 7 cakes, the one I'm baking and 6 to put in the cupboard. The bags are labelled with the type of cake the ingredients will make - chocolate, coffee, butter, sultana, cherry or whatever, a list of wet ingredients and the instructions. I do this a lot so I have marked the bags with a Sharpie. Once the mix has been used the bag is washed and dried and put away ready to use again - and the instructions are already written on it. 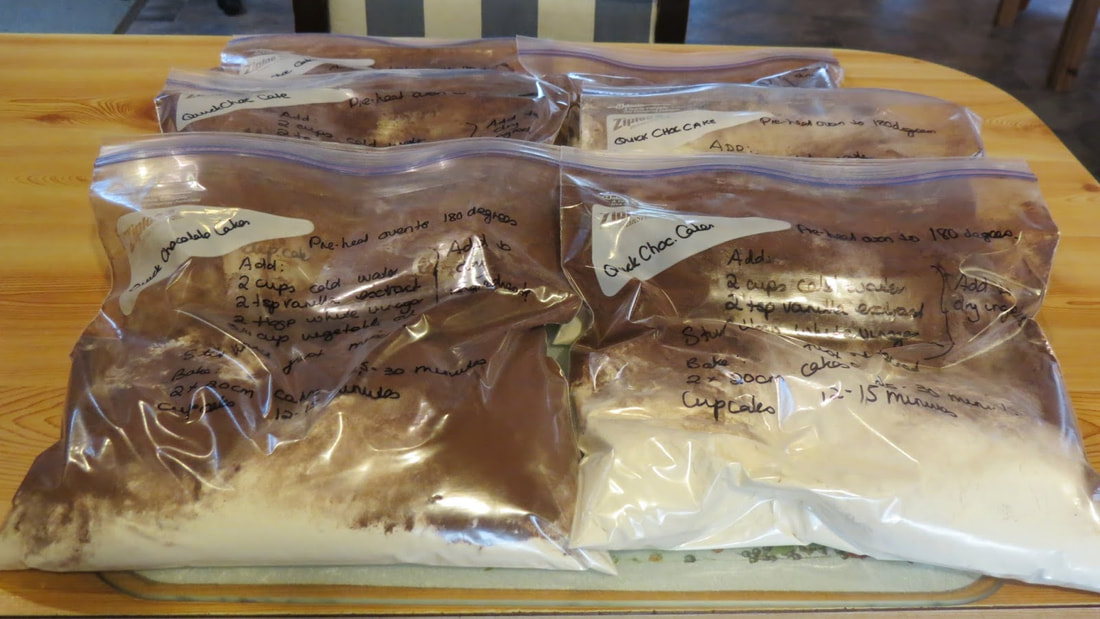 This is a quick chocolate cake I make into MOO Cake Mixes.
Quick Chocolate Cake Dry Ingredients: 3 cups SR flour 2 cups sugar 1/4 cup cocoa Wet Ingredients: 2 cups cold water 2 tsp vanilla extract 2 tbsp white vinegar 3/4 cup vegetable oil You can double, triple, quadruple the quantities (I measure out 7 lots at a time). Put the dry ingredients into ziplock bags and seal. Label the bag and add a list of the wet ingredients and the instructions. To make a cake add the wet ingredients to the dry ingredients. Stir until just combined. One quantity will make 2 dozen cupcakes or two 20cm square cakes. Bake at 180 degrees Celsius for 25 - 30 minutes for 20cm cake (or until a skewer inserted in the middle comes out clean). Bake for 12 - 15 minutes for cupcakes or until a skewer inserted in the middle comes out clean.  From mid-September the way electricity in Victoria will be priced is changing. There will be peak, off-peak and shoulder periods and the price will vary according to the time of day, and the day of the week, with the busiest part of most people's day being of course the most expensive. And so I have been thinking.
The off-peak rate runs from 10pm - 7am. This will be the cheapest rate for electricity. I don't know about you but I'm not that keen on staying up at night to do the washing and the floors, and running the dishwasher when the rest of the family is trying to sleep just won't work in our household. Electricity prices are on the rise. It's a catch 22 situation because our reliance on electricity is also on the rise. Almost every appliance in our homes is electric: stoves and ovens, microwave ovens, kettles, food processors, mixers, toasters, sandwich makers, bread makers, washing machines, irons, clock radios, hair dryers, toothbrushes, shavers, heaters, air conditioners, vacuum cleaners, computers, lighting and the list goes on. Many of those appliances have a non-electric version that we could just as easily use, but we've been brain-washed into thinking they are too hard to use or too old-fashioned. They're not! And they slash power use. And that slashes the power bill, saving us all money. I've been curious as to just how much we use electricity because we have it at the flick of a switch, because it's too convenient. In August I put out a challenge to Cheapskates Club members: could they live for 48 hours with access to just 3 hours of electricity a day? The challenge was accepted and the results were interesting. Overall most households managed with a few lifestyle modifications. They all said they wouldn't want to have to live with such limited power forever. So do you think you can live with access to just three hours of electricity a day? Are you prepared to accept the challenge and see if you really can cut your electricity use and slash that bill without compromising your lifestyle? Are you up to the challenge? Just two days, 48 hours, and you can choose the days, to try living with access to electricity for just three hours a day. The rules are simple and more guidelines than rules. You can: 1. Commit to the challenge by leaving a comment below agreeing to participate in the challenge. 2. Spread the word. Talk about it, email it to your family and friends, blog and tweet about it. Encourage as many people as you can to take part. 3. Use whatever appliances you need to during the 3 hours of allowed power time. You could have the TV and every light in the house on if you need too (an extreme example). 4. Break the three hours up any way you want, but once the time is up that's it - no more electricity for the day. We chose 45 minutes in the morning and 2-1/4 hours of an evening. 5. You can use battery powered appliances out of hours. 6. You can use any appliances during the "on" hours. You can't: 1. Use any appliance that requires a power point or light switch during the 21 hours a day you can't access power, the exceptions being fridges and freezers, wired in smoke detectors and any medical aides that must be used (nebulizers, ventilators etc.). I'd like you to keep a diary for the 48 hours, recording what you used and what you found you didn't really need to use, the things you missed, how you filled in TV time if you normally watch TV, how the family filled in the evening without power or lights etc. whether or not you were able to stick to the three hours or just found it unrealistic or impossible, and record the actual amount of power you used in total over the six hours. You can add your diary notes and ask any questions in the comments below. From Debt Free, Cashed Up and Laughing 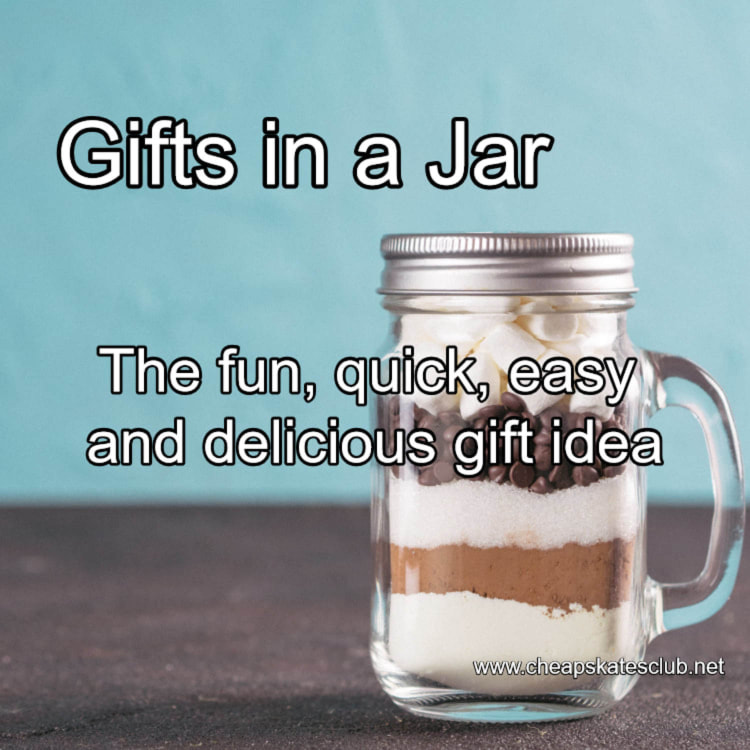 Need a gift in a hurry? Go to your stash of jars then head to the pantry and start packing that jar with all the ingredients to make Simple Shortbread or Snickerdoodles and voila you have a gorgeous, very useful, very inexpensive gift in a jar!
FROM THE MEMBERS CENTRE: GIFTS IN A JAR Gifts in a jar can be as simple or as complex as you like. They can be in jars or boxes or buckets or any other container suitable for the contents of your gift. They can be for eating or gardening or sewing or relaxing in the tub. Gifts in a jar are only limited by your imagination. Here are two of my favourites: Simple Shortbread Mix Ingredients: 1 cup SR flour 1/2 cup ground rice 1/4 tsp salt 3/4 cup castor sugar Method: Combine ingredients and pack into a jar. Attach label with instructions as below. Simple Shortbread 1 jar Simple Shortbread mix 1 cup butter Heat oven to 150 degrees Celsius. Cut cold butter into flour with a knife. Using fingertips knead shortbread mix and butter until mixture resembles breadcrumbs. Use a knife to mix into a dough. Press mixture into a shortbread mould (if you have one) and cook on a baking sheet or press and cook in a greased, 20cm round cake tin. With a butter knife mark out wedges (you should get 12). Bake for approximately one hour, or until light golden on top. Do not brown. Cut into wedges while still warm. Snickerdoodle Mix 2 3/4 cups SR flour 1 1/2 cups sugar 1/4 tsp salt Method: Combine ingredients and pack into a jar. Attach label with instructions below. Snickerdoodles 1 jar Snickerdoodle mix 1 cup butter 2 eggs 2 tbsp sugar 2 tsp cinnamon Heat oven to 200 degrees Celsius. Cream butter with electric mixer until light and fluffy. Add eggs and beat until mixture is smooth and creamy. On low speed, add Snickerdoodle mix and beat until a dough forms. Roll dough into balls about the size of a 20 cent coin. Mix sugar and cinnamon in a small bowl. Roll balls of dough in the cinnamon sugar and then place on ungreased cookie sheets, about 5cm apart to allow room for spreading. Bake 8 - 10 minutes until light brown. Cool on wire racks. 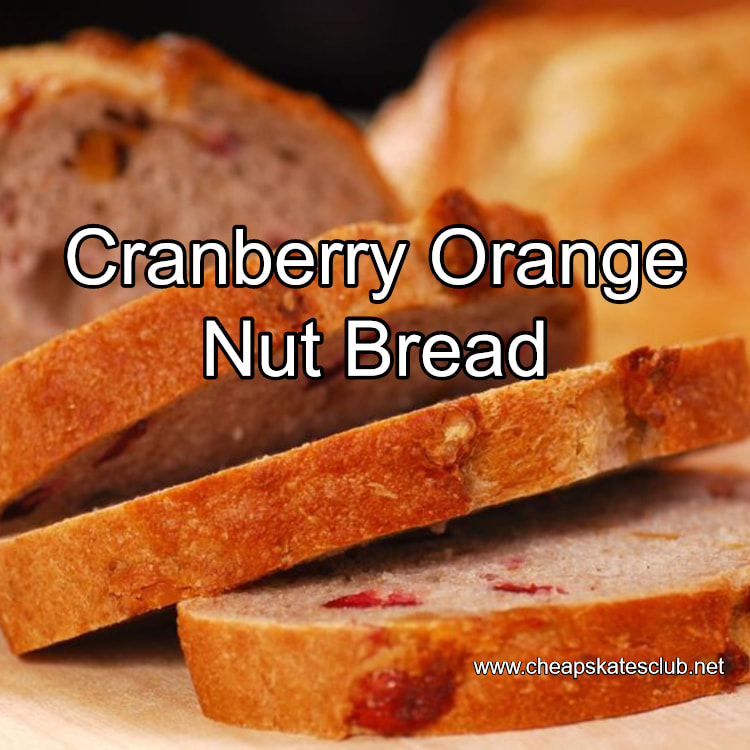 Cranberry Orange Nut Bread
Ingredients: 2 cups plain flour 1 cup sugar 1 1/2 tsp baking powder 1/2 tsp salt 1/2 tsp bicarbonate soda 1 tsp orange zest 3/4 cup orange juice, freshly squeezed 2 tbsp melted butter 1 egg, beaten 2 cups craisins* chopped roughly 1 cup chopped walnuts Method: Preheat oven to 170 degrees Celsius. Grease and flour a 9x5x3 loaf pan. Sift the flour, sugar, baking powder, salt and bicarb soda into a large bowl. In a separate bowl, whisk together the orange zest, orange juice, melted butter, and beaten egg. Slowly add the wet ingredients into the large bowl with the dry ingredients, stirring until just combined - do not over stir. Add the craisins and the walnuts and fold in until combined. Pour into prepared loaf pan. Bake in preheated oven for 55 minutes to 60 minutes. Remove from oven and let stand in loaf pan for 5 minutes, then turn out onto a cooling rack and let rest for several hours before serving. Makes 1 loaf. *Craisins are dried cranberries and are available in the dried fruit aisle of your supermarket.  Raspberry Jelly Pops 1 raspberry jelly 1 cup boiling water 1 cup vanilla yoghurt Dissolve jelly in boiling water. Cool for a few minutes. Add the vanilla yoghurt mix well. Pour into icy pole moulds, leaving 1cm at top for expansion. Freeze. Strawberry Banana Icy Poles Ingredients: 1 punnet strawberries, hulled 1 banana, peeled 1 cup apple juice Blend all ingredients until smooth. Pour into icy pole moulds and freeze. Fruit Salad Icy Poles 2 cups fruit salad 1 cup pineapple or apple juice Blend fruit salad and juice until smooth. Pour into icy pole moulds and freeze. Watermelon Icy Poles 2 cups watermelon chunks 2 cups orange or apple juice (or 1 cup of each) Blend until smooth. Pour into icy pole moulds, leave 1cm gap at top for expansion and freeze. Lemonade Icy Poles This was my mother's favourite icy pole - just plain old lemonade, frozen. Nothing else added, it really is refreshing and cooling. Simply fill icy pole moulds with lemonade. Leave 1cm gap at top for expansion. Freeze. Jam Creamsicles Fill an almost empty jam jar with milk. Shake until all the jam is off the sides and bottom of the jar. Pour into icy pole moulds and freeze. You can use any flavour jam, but we prefer either strawberry or raspberry. Pineapple Kiwi Fruit Icy Poles
4 kiwi fruit, peeled 1-1/2 - 2 cups pineapple juice Blend kiwi fruit and pineapple juice until smooth. Pour into icy pole moulds, leave 1cm gap at top for expansion and freeze.  You don't need to have a hot air corn popper to make fresh popcorn at home. You don't even need a microwave. You can easily pop popcorn the old fashioned way - in a pot with a lid on the stove! Popcorn popped on the stove has a smokier, much richer flavour and much less un-popped kernels than corn popped in a hot air popper or the microwave.
To pop popcorn on the stove: 1.Pour approximately two tablespoons of vegetable oil into the bottom of a large saucepan with a tight fitting lid. 2.Add enough popcorn to cover the bottom of the saucepan in a single layer. 3.Put the lid on and cook over a medium heat until you hear the first "pop". 4.Using the saucepan handle, carefully and gently shake the entire saucepan over the heat until the popping stops. Keep the saucepan moving or the corn will burn. 5.Remove from heat, take the lid off and tip the popcorn into a serving dish. Season if you wish to. To pop popcorn in the microwave: 1.Using a brown paper lunch bag, cover the bottom of the bag with popcorn. Make sure that the entire bottom of the bag is covered. 2. Fold over the top of the bag and staple it closed. Yes, the staple is metal, but it won't spark. 4. Place the bag in the microwave, lying down. 5. Cook on high until the popping stops. This will vary depending on how powerful your microwave is. I suggest that you start at two minutes and check. It may need another 30 seconds or so to complete the popping process. Popcorn Tips: Store your popcorn in the freezer. This helps all the kernels to pop. Buy your popcorn loose from your local wholefoods or health food store, rather than in packets from the supermarket. You can buy as much or as little as you need. Remember, 200g un-popped popcorn makes an awful lot of popped corn, a little goes a very long way. You can re-use the paper bag for microwave popcorn if you are very careful opening it. To add butter to freshly popped corn, melt the butter and pour it over the hot popcorn. Stir quickly to cover all the kernels. Caramel Popcorn Ingredients: 20 cups pop corn 2 cups light brown sugar 1 cup butter or margarine 1/2 cup condensed milk 1 tsp bicarb soda 1 tsp vanilla extract Method: Spread the popcorn in a thin layer in shallow, greased baking pans. Preheat oven to 120 degrees Celsius. Combine the brown sugar, condensed milk and butter in a medium saucepan. Stir to combine. Bring to a boil over a medium heat. Boil for five minutes, stirring continuously. Remove from the heat and stir in the bicarb soda and vanilla essence, beating well. The mixture should be light and foamy. Immediately pour over the popcorn. Stir with a fork to mix. Don't worry too much if not the popcorn isn't completely covered with the caramel. Place into preheated oven and bake for one hour, stirring completely every fifteen minutes. Remove from oven and empty onto sheets of baking paper. Break the caramel corn into bite size pieces. Allow to cool completely before storing in an airtight container. Variation: Bliss Bombs - add 2 cups unsalted peanuts to the popcorn before covering with the caramel mixture. 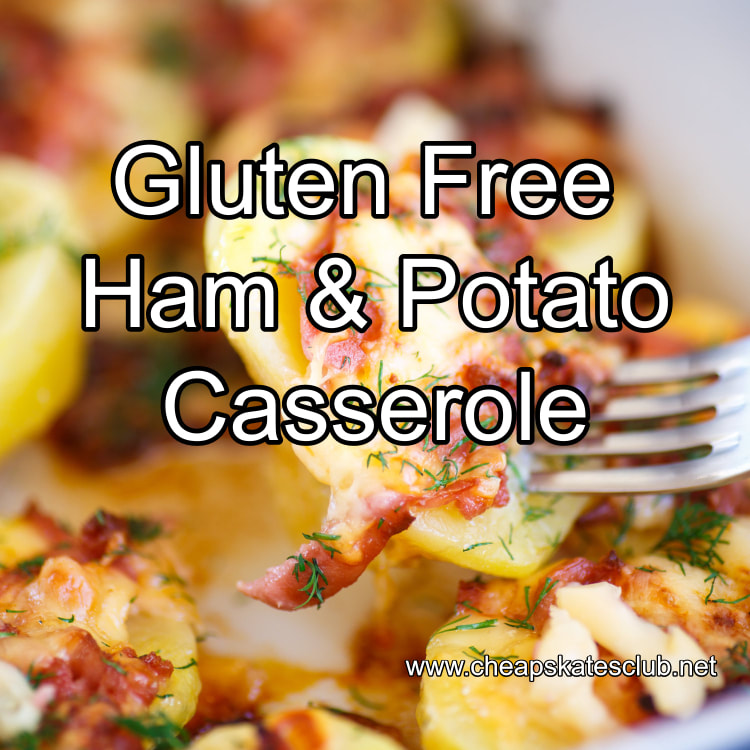 This is a great weekend brunch or Saturday night tea, another one you can put together and let it cook while you relax. I serve it with a tossed salad and crusty bread.
Ingredients: 6 potatoes, peeled 4 tablespoons butter 1 cup grated tasty cheese* 1 cup grated Gruyere cheese* 1 onion, finely chopped 250g ham 1 cup light sour cream 8 eggs 1 tablespoon butter Salt to taste Pepper to taste Method: While preheating oven to 175 degrees Celsius, peel the potatoes and quarter. Place them in a large pot and fill with water to cover. Bring potatoes to a boil and continue boiling for 7 to 10 minutes (you want the potatoes to be soft but not so soft that you can’t slice them). While the potatoes are boiling, put 4 tablespoons butter in a baking dish and melt in oven, then tip baking dish to make sure butter is distributed. In a bowl, toss together the cheeses; set aside. In a separate bowl, beat the sour cream and eggs together; set aside. Once the potatoes are done, drain them and slice each piece in half. Remove the baking dish from the oven and dump half the potatoes into the pan and layer as evenly as possible on the bottom of the dish. Sprinkle with salt and pepper and set aside. Take the remaining 1 tablespoon butter and place it in the same pot you boiled the potatoes in. Add the onion and sauté until tender, approximately 3 minutes. While the onion is being sautéed, chop the ham. Mix the ham and onion together in the pot with the heat turned off, and then layer half the mixture over the potatoes in the baking dish. Scatter half the cheese mixture evenly over the ham-onion mixture, then put the remaining half ham-onion mixture on top, then use the remaining cheese mixture and sprinkle on top, then pour the egg mixture over all evenly. Bake for 40 to 45 minutes or until golden brown. *Note: I don’t keep Gruyere in the house as a rule so I will often just use two cups of whatever cheese is in the fridge, or a combination of tasty, mozzarella and parmesan. From the Cheapskates Club Gluten Free Recipe File |
Archives
April 2020
Categories
All
|
 RSS Feed